Wednesday 27 June 2012

Cupcakes and photos

Today my very talented friend, the photographer Hayley Walker gave me a photography tutorial:  light, light, light, and aperture...that's all; easy, right?! She makes it look very easy, but Hayley's got a heap of natural talent, and experience, so I can only wish to be able to take such beautiful photos...

Hayley's pic's


vs. my photo:


Um, yes, I need a bit more practice...

I once heard, though, that practice doesn't make perfect, it just makes permanent! So it helps to get pointers from experts, otherwise you just entrench bad techniques.

And when it comes to cake decorating, it is just as true. 
Maybe one day I will be confident enough to show you the pictures of the first birthday cakes I did for my son. But I'm not ready yet! I still need to work on the "after",  before I'm strong enough to laugh at the "before" : )

  Take a look at Hayley's gallery on www.hayleywalker.co.za or visit her on Facebook (Hayley Walker Photography). It's great having such talented friends - I'll have to invite her around every time I bake....


Sunday 24 June 2012

Swiss Meringue Buttercream with Hidden Centre Cupcakes

I just wanted to share a quick post with you about SMB, again...because this time when it curdled, I took pictures!

I had a plan to make Vanilla cupcakes with caramel centers, so I didn't want an overly sweet icing like butter icing, and I still had some SMB in the freezer, from the previous batch I made (see Oh, Cupcake!). Perfect!

For the Vanilla cupcakes, I used Haniela's Velvet Vanilla Pound Cake recipe, spooned the batter into cupcake cases, and added a blob of caramel to the centre, followed by some more batter. This only works with dense cakes, if you try it in a light and fluffy batter, the "secret centre" becomes a embarrassing expose on the bottom of the cupcake  ;  )

The Swiss Meringue Buttercream had thawed overnight, and I wanted to add a touch of caramel to that, too. So I heated a couple of tablespoons of caramel in the microwave, and added that to the SMB. Instant curdle!
 But I'm hardened to it now! So as unappetizing as it looked, I just proceeded to the next step - remember? Beat, beat, beat.

Curdled...


After 'old woman in the shoe' treatment....


And the final product....


I could eat one again, just looking at the picture...


xxM


Cupcake Classes

The next couple of cupcake classes we're doing are "Dress-up" themed, so I have been practising making little handbags and shoes. And a lot more practicing I need!

I look at the amazing things that some very talented cake decorators are doing, and although I feel inspired on the one hand, on the other I feel completely intimidated and out of my depth! Just go and look at the bag and shoe cupcake toppers on Cakes.KeyArtStudio.com - aren't they exquisite?!

Anyway, I really enjoyed trying to figure out making a presentable mini-bag. Can't wait to try a few more.


But I wasn't having much fun with the Jem Cutter that I was using for the mini-shoe.
Why, oh why don't they have an opening in the stalk / holder part in all their cutters, like they do with their 5 petal rose cutter? Instead of nudging your delicate paste out from the centre of the cutter, you have to gouge it out from the edge, and then try hide or fix the blemish?? Am I missing something? Anyone from Jem out their listening?? You're not making life easy for us unsure novices!

I also took a stab at the Millefiori technique that Lindy Smith describes in her book "The Contemporary Cake Decorating Bible", to create animal print...can you tell?? The black / brown and gold was supposed to be leopard print; it looks more like tiger...but I still kinda like it... rwaooar!   : )


Anyway, looking forward to seeing some of you at the next few classes.

xxM

Monday 18 June 2012

Cookie Recipe

This was the first Cookie recipe I saved onto my iPad, but I didn't try it out until last week when I was preparing the Father's Day cookies.
 I'm glad I did! It is pretty tasty, and maintains the cut-out shapes well. But I did find that the tops of the cookies bubbled when baked, so each one had to be smoothed down with a palette knife to get a better surface for icing.

I also added a tablespoon of milk to the original recipe, because my dough wasn't very doughy! Probably because I was using Vanilla paste (in the little pump dispenser from Woolworths Foods - love their new cupcaking/baking range!), instead  of the Vanilla extract that the recipe called for.

So, this is my version:

Ingredients:

2 1/2 cups cake flour
3/4 cup caster sugar
1/4 tsp salt
225g butter - cool, but not hard! and cut into small cubes.
1-2 pumps Vanilla paste
2 TBS cream cheese, at room temp.
1 TBS milk

Method:

In the bowl of a mixer, mix the dry ingredients on low speed for a few seconds to combine.
Add the butter, one cube at a time, with the mixer running on low speed. Continue mixing until the mixture looks crumbly.  Add the vanilla, cream cheese and milk, and mix until it just starts clumping.

Then mix by hand, and knead in the bowl until the mixture comes together.

Divide the dough into two balls, and place each half into a clean plastic bag.

Refrigerate for about 30-60 minutes.

Take one ball out at a time (so that the dough doesn't all soften); roll out, and cut out shapes.  Place cut out shapes on a baking tray about 2cm apart, and put back into the fridge for 15 minutes.

Repeat with the second ball of dough, or freeze it if you only want to bake a few cookies at this time.

Bake until the edges are a light golden brown.


I'm going to try adding a little mixed spice and orange zest to these ingredients. If you do it before me, let me know how they turn out!

xxM


Thursday 14 June 2012

Chocolate Marshmallow Fondant

...and this one is for Chantal, who is baking and decorating for her daughter's 6th birthday...

Chocolate Marshmallow Fondant 
Recipe from Louise,  cakejournal.com

(I usually use half these quantities!)

450g marshmallows - because you are making chocolate MMF it doesn't matter if they are pink or white
2TBS water
500g-1kg sifted icing sugar
1/2cup sifted cocoa powder
Holsum (white veg fat) - for greasing hands, bowl, spoon, axle, whatever.

Grease a heatproof bowl well with the Holsum.
Put the marshmallows into the bowl with the water.
Heat in the microwave for a minute, take out and stir.
Then heat for another 30 sec -1 minute; stir until the marshmallows are smooth.
(Caution - extremely hot! Avoid skin contact!)

Add the Cocoa powder, and some of the icing sugar. Stir with a spoon greased with Holsum.
Turn this mix out onto a well greased surface. Add some more icing sugar.
Knead with well greased hands (take any rings off!).
 At this stage, you're hands will be trapped in what feels like an infinitely sticky mess. The temptation is to add all the icing sugar to escape the gooey prison, but don't! Just add a little icing sugar at a time.; you will not need to use all of it.

Knead until it is no longer sticky, but still pliable.  Rub the surface with Holsum, wrap in cling-film, and then place in an airtight plastic bag to store.

If the MMF is very stiff when you come to using it, microwave for a few seconds.
if it is dry, knead with Holsum.  If it is too soft, add more icing sugar.


(Omit the Cocoa, use only white marshmallows, and add desired coloring if you don't want chocolate flavoured MMF.)

Marshmallow Fondant is much better tasting than store bought Fondant. And I also find it easier to work with for covering cakes.

Happy creating!

xxM


PS. anyone know where we can get just white marshmallows in South Africa??


Cupcake recipe!

This cupcake recipe was given to me by Nikki Palmer -  who was the inspiration behind my cupcake decorating journey. Thank you Nikki!

It is a quick and easy vanilla recipe that produces up to 36 cupcakes. I have also used it to make one giant cupcake - it's the perfect amount of batter. And for a layer cake. Because it bakes pale, it's a great cake to use for rainbow layers, or an ombre'd effect.

The cupcakes rise flat or with only a slight dome - which is handy for certain styles of decorating (especially covering with fondant).  The batter is fine if left on the counter waiting for some space in the oven.
Don't overcook!


Vanilla Cupcake Recipe
Recipe from Nikki Palmer

Ingredients:
4 eggs
2 cups Castor sugar

2 cups cake flour
2 tsp baking powder

1 cup milk
1/4 cup vegetable oil
2 tsp vanilla extract

Method:

Set the oven temp at 175'C

Mix the milk and oil together in a jug, and heat in microwave for 2 min on high. Set aside for 15 minutes, then add the vanilla.

Place the sugar and eggs in a mixer, and beat on high for 6 minutes, until pale and fluffy.

Sieve the flour and baking powder into two separate bowls.

Add 1/3 of the flour to the egg mix, then half the milk mix; gently blend. Add another 1/3 of flour, then the rest of the  milk mix; gently blend. Finally add the rest of the flour and then the baking powder.
Mix until just combined.

Use a 1/4 or 1/3 cup measuring cup to fill your cupcake case lined muffin tray.
Bake for 15-18 minutes.

These cupcakes need to be covered with icing as soon as they are cool, or frozen if not used immediately.  Left unfrosted, their surfaces become tacky in a short space of time.


xxM


Tuesday 12 June 2012

Swiss Meringue Buttercream

Swiss Meringue Buttercream was not something I had heard about until a few months ago. We South Africans don't seem to use much more than Butter icing or Cream Cheese icing when decorating our cakes and cupcakes - speaking from my vast experience ;-)
It came as quite a revelation to me that there are icings/frostings out there, that aren't just made by dumping a bag of icing sugar into a mixer with a block or butter, finished off with half a bottle of Moir's or Robertson's food colouring!

So, here is a little bit about SMB:


Swiss Meringue Buttercream
(Recipe from Rosie, at Sweetapolita)

5 large egg whites
1cup + 2 TBS castor sugar
250 -300g butter, cut into cubes, at room temp. (unsalted, preferably, but I use salted as unsalted butter is less available in this country, ie more expensive!)
2tsp vanilla extract
pinch of salt (omit if salted butter was used)

As you are making meringue, your equipment needs to be completely grease free: wipe it with lemon juice on a paper towel before you begin.

Place the egg whites and sugar into your mixing bowl, and place that over a suitable saucepan of simmering water. The bottom of the mixing bowl must not be in contact with the water, and the water should not be boiling.

Whisk constantly.

I confess, I don't... I'm usually dashing around my kitchen, doing something else, but I endeavor to whisk constantly!  Actually, the last batch I made, had two quite long interruptions. The first when Jack (3) came tearing inside after an encounter with a monkey in the garden (ah, life in Africa), and the second when Sabrina (2) woke up from her nap.  No peaceful baking in this home.

...so whisk constantly, ahem, but gently, until the egg whites are hot to the touch, and you can no longer feel granules of sugar between your fingers.  (Fingers having been washed after any encounters with toddlers or monkeys.)


Move off the stove, and to the mixer.


Using the whisk attachment, whip until it forms a thick and glossy meringue.  Delicious!


mmmm!

what's next?

When the mixing bowl feels neutral to touch (ie, no longer hot), change over to the paddle attachment, and add the butter one cube at a time.

It will go from looking "gloopy", to suddenly thickening up as the last few cubes of butter are added.


 It may curdle, but just keep whipping until it reaches a satiny smooth texture.


Add the vanilla extract and salt .

Other flavours and colours can be added, including melted chocolate. Yum!

Go over to Rosie's site (sweetapolita.com) to see all the variety of SMB's she makes.  


I have no idea how SMB will hold up during a humid Durban Summer, but give it a try on one of these mild Winter days.  It really is a heavenly icing!

PS. It freezes well! Just thaw overnight, and then beat back into shape. If it is too stodgy still, remove a small portion, heat in the microwave for a few seconds, then add back to the main batch. If it curdles, beat, beat, beat!
If it is too loose, put in the fridge for 15min, and then beat again!


Happy whipping!

xxM


Wednesday 6 June 2012

Oh, Cupcake!

What a Cupcake of a morning last Saturday!
I had volunteered to donate 100 cupcakes to my son's pre-primary school "Big Walk" fun day. That Sunday, the Comrades Marathon ran/walked/staggered right past our suburb. So the little guys had their Big Walk around this time of year to feel part of the spirit, and raise money for the school.

100 cupcakes to decorate before 8am. A bit of an ultra-marathon in its own right! Thankfully I had baked and frozen all the cupcakes the previous weekend (I love cakes / icing that freeze well!). 30 Vanilla, 36 Chocolate and 34 Red Velvet cupcakes: to be covered with Swiss Meringue Buttercream (SMB), "Chocolate Mousse" icing and Cream Cheese icing respectively.

From the early hours of the morning, I'd been waking up thinking that I should take all the icing out the fridge to make sure it was soft enough for piping. But the thought didn't become action until about 5am. So by the time I started icing the cupcakes (probably an hour later than I should have!) it was all still a little stiff. I started with the SMB - trying to beat it softer, but as it was still too cold, I removed a couple of tablespoons, heated it in the microwave, and then added it back to the mixing bowl.
Voila! It curdled!
I have very little experience with SMB, but sometimes a little is all you've got! Everything I do know about it, I have learnt from Rosie at sweetapolita.com. Please, go visit her site sometime. She is an amazing baker and photographer! Some people have all the talent!

Anyway, I left it alone being beaten into submission in the mixer, while I moved onto the cream cheese icing. Which I started to pipe (with great effort as it was still too cold) onto the Vanilla cupcakes... It was supposed to be on the Red Velvet. Thankfully because it was cold I could scoop it up easily, and started icing the Red Velvet cupcakes instead. But because it was so stiff I was applying a lot of pressure to the icing bag, and naturally it popped a valve/ burst an aneurysm - disgorging the nozzle and a loooong sausage of icing.
Oh, Cupcake!
Cleaned that up.
And then ran out of icing with 3 still to go. Ha Ha.
The chocolate icing wasn't such a comedy of errors, but it still tested me. Air bubbles, indifferent swirls, blah, blah.

So by the time I got back to the SMB, hands shaking from frustration and too much spilt icing for breakfast, I didn't have great expectations... but, what do you know: It piped like a dream: smooth, silky and graceful!


I should have taken pictures of all the chaos in my kitchen, but I was just NOT IN THE MOOD!

After all the swirls, the rest of the decorating took no more than 2 minutes. In fact, if you don't have icing issues, big swirls and a bit of bling are such a fast and effective way to decorate cupcakes. Be aware though, that swirls take up a lot of icing, so don't be caught short.

I decorated the Chocolate cupcakes with a classic swirl, using an Ateco 824 nozzle, and gumpaste butterflies.

The Red Velvet, with "groovy" swirls using an Ateco 865 nozzle, red & white sprinkles and hearts.

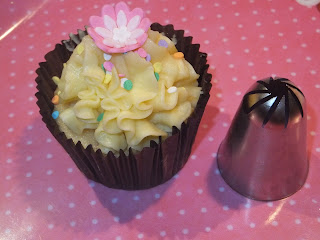
And the Vanilla cupcakes with ruffles, using an Ateco 888 nozzle, layered gumpaste flowers and sugar pastels.

These little guys were holding up signs for each flavour of cupcake


There was a brown teddy, for the chocolate cupcakes, but he lost an ear and a leg in the line of duty: missing, presumed eaten. So he was too gruesome to photograph.

Anyway...you wouldn't have know from the end product that pandemonium had reigned. The cupcakes were all sold, all eaten, and all forgotten!

Sunday 3 June 2012

Welcome!

Welcome to Tea, Cake & Create! I hope you enjoy your visit.

 I have always loved baking, but I was a reluctant recipe follower. I loved experimenting, and trying to create something deliciously different. Sometimes it worked, often it didn't (chewy rusks, paper-weight muffins)! But even the successes were difficult to reproduce, as I kept no track of my experiments (despite my scientific background in my traditional profession!) After I did a cupcake decorating class, however, I realized that decorating the cakes / cupcakes / cookies that I was baking was actually the creativity that I was craving, rather than the creative baking! And so I began to pay much closer attention to recipes and baking techniques, trying to create the perfect canvas for decorating.

 Tea, Cake and Create came into being when I started running out of family and friends on whom I could foist my cookies and cupcakes!
So I decided to  invite people around to share the decorating experience. As they grow from my immediate contacts, a lot of the women who come to classes are mothers of young children. My vision is to provide them with some time out from childcare, doing something creative - especially concerning food, to satisfy that need to nurture! - and hopefully leave them feeling inspired and uplifted. I run Cupcake or Cookie decorating classes every week / 2 weeks. Usually on a Friday morning, here in Winston Park, Durban. We sit out on the veranda, decorate, have tea and cake and....create!

 Have a look at the calendar to see what's happening in the next few weeks.

 xx Marina