Saturday 26 January 2013

Black Cherry Chocolate Cupcakes


I wrote you a haiku.....


Such simple pleasures
Hidden, but bite revealed
In secret centres


Ok, I'll stick to baking : )

Have I mentioned before that I love secret centers?

Sometimes the combination of the flavors compliment each other so well, that it's just .....pure poetry!

I haven't made cupcakes with a hidden centre for a while, and when I made these chocolate cupcakes with their ingredient of apricot jam, it made me think about using preserves as a secret centre....and, there you go: black cherry chocolate cupcakes!


Black Cherry Chocolate Cupcakes
recipe by Tea, Cake and Create 


Cherry Flavoured Swiss Meringue Buttercream.

5 large egg whites
1cup + 2 TBS castor sugar
340g butter, cut into cubes, at room temp.
A couple of drops of cherry essence.
Dusty Rose or Soft Pink gel colour.

Put the egg whites and sugar into a mixing bowl, and place that over a suitable saucepan of simmering water. The bottom of the mixing bowl must not be in contact with the water, and the water should not be boiling.

Whisk constantly, until the sugar granules have dissolved and the mixture is hot to the touch.

Move off the stove, and to the mixer.
Using the whisk attachment, whip until it forms a thick and glossy meringue.

When the mixing bowl feels neutral to touch (ie, no longer hot), change over to the paddle attachment, and add the butter one cube at a time.
 It may curdle, but just keep whipping until it reaches a satiny smooth texture, and holds its shape.

Add the cherry essence - just a couple of drops, essences can easily become overpowering, and the colour.


Chocolate Cupcakes with Cherry Preserves


Pre-heat the oven to 180'C
Line 2 x 12 hole muffin pans with cupcake cases.


2 cups cake flour
2 cups sugar
3/4 cup cocoa powder
2 eggs, lightly beaten
1 tsp salt
1tsp baking powder
2 tsp bicarb
1 cup oil
1 cup buttermilk
1 cup boiling water
1tsp vanilla extract (I use Vanilla Girl vanilla - just a few drops)

1 jar good quality black cherry jam /preserves

Sift together the dry ingredients.
Make a well in the middle then add the other ingredients. Beat well.

Use a scoop, or 1/3 cup measuring cup to pour the batter into the cupcake cases. (It is a very runny batter).

Bake at 180'C for approx. 20minutes.

Allow the cupcakes to cool.
Spoon the cherry preserves into a piping bag fitted with a large round nozzle (eg an Ateco 802). Push the nozzle into the cupcake and squeeze in some jam.


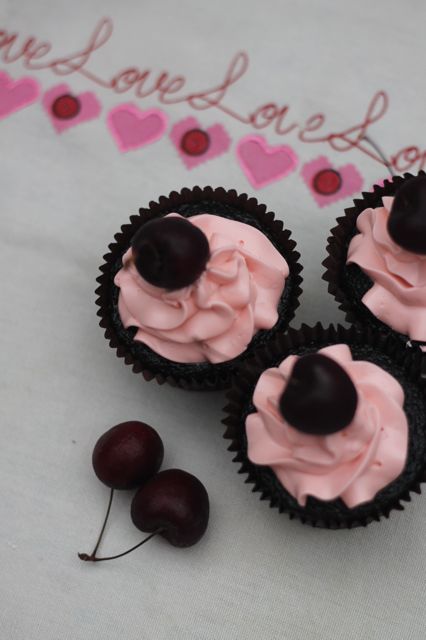
Ice cupcakes with pretty pink cherry-flavoured SMB. Top each with a fresh cherry.

Notes:
Allow the cupcakes and their jam filling to get to know each other for an hour before you introduce them to your guests ; )
It gives them a little time to let the cherry flavour infuse into the chocolate cupcake.

I'm sure you could use a tablespoon of the cherry jam instead of the essence, but cherry essence is one of my favorite flavours, and well worth having in your  my cupboard.

I'll leave you with a haiku from a master:


A lovely spring night 
suddenly vanished while we 
viewed cherry blossoms

Matsuo Basho


xxM

Sunday 20 January 2013

The Blues...and Reds

So, I've been struggling to find my groove this year. Battling a crisis of confidence (spending too much time looking at all the stunningly perfect creations out there!) and feeling emotionally drained (Sabrina has not been happy about starting school), and getting too little sleep; I'm not feeling on form, yet.
But, I'll get there!!

What really helps me to get excited about a project, is when I have "clarity of colour". When I know the colour combinations I'm going to be using, and they're just right, it really inspires and motivates me.
 
For our first class this year, I was steering away from anything red, white and green. Overdosed on Christmas colours in December, you think? (In fact, I'm not even planning on using red for Valentine's classes this year! )
Last year I'd made some owl cookies with blue, brown, and orange (I hadn't planned that combination beforehand; they were just the non-red and non-green bags of icing left over from a class where we'd decorated snowmen and reindeer). I loved the way they looked together.
So, it seemed like a great idea to use those colours again for the "Birds" classes.
But when I did my demo cookies, the orange seemed too orange, and I toned it down to "peach" for the class. Insipid. (And I know the ladies in the class didn't like it either - they came right out and told me! Gotta be tough in this game! )
In an attempt to oomph it up, (in preparation for the next class - not wanting to offend my cookie-gals, again!) I reluctantly added a couple of drops of red: "Red Red", to be precise. Gorgeous result! Exactly the colour I should have been aiming for in the beginning. Inspiration!

"Melon Pink" and Electric Blue


Often, though it can be more frustrating than that, and it can take a lot of tweaking to get the right shade. It doesn't help that the names of gel colours can be very deceptive. (I really can't tell the difference between Sky Blue and Electric Blue, can you??; and clearly Red Red is pink. Melon pink.)


"Melon Pink" at 10 o'clock
Sky vs. Electric?? 


There certainly isn't anything wrong with blending colours - and it's often the only thing you can do if you want a particular shade.

I usually blend together a few (often random!) shades to get the colour I'm looking for. And then have no idea how to reproduce that colour again! So, I think, for my next few projects I'm going to challenge myself to stick to the colour that's in the bottle. Gulp! Will I be able to resist a tweak here and there? Let's see how that works out!

There are some really helpful posts out there - try these ones by Lilaloa, and Sweetsugarbelle, that give great advice about colour and how to create certain shades...

(As a matter of interest, locally we have the Cake Flora gel colors and I strongly suspect that they are the same as the Americolor range. )


Stay tuned for some "no-colour-blending" Valentines projects over the next few weeks!


xxM


Friday 18 January 2013

Mocha Cake Pops

Do you remember when I wrote about the Vanilla Latte Cupcakes, I suggested that you could use the extra cupcakes for cake pops? Well, that is exactly what I did:
Lets call them...

Mocha Cake Pops 

Ingredients:

400g cake crumbs
80 -100g icing
(both from the above recipe)

500g cooking chocolate, chopped into small pieces

16-20 lollipop sticks
A colander, or a styrofoam block

Blend cake crumbs and icing together in a food processor. If the balls aren't moist enough to hold their shape, add more icing... but don't over-goo it!

Use a scoop to form equal sized balls, shape by hand, or use cake pop moulds if you are lucky enough to own them.
Place on a baking sheet, and cover with cling-wrap. Pop them into the freezer for 15 minutes.


Melt chocolate completely (use a deep, narrow bowl or pyrex jug).  You can do this in the microwave on low-medium power, or in a double boiler. (Don't let any water droplets come into contact with the chocolate). The chocolate needs to be thin and runny.

Take the cake balls out the freezer. Dip the lollipop sticks into the chocolate, and then insert into the cake ball - about halfway in.
Now, holding the lollipop stick dip the cake ball all the way into the chocolate, right to the base of the lollipop stick. Remove and hold at an angle against the bowl of chocolate. tap against the side of the bowl to allow the excess chocolate to drip off.
Top with sprinkles.

Use the upside down colander or styrofoam block to hold the cake pops up.


Ready to be eaten as soon as the chocolate has set. Delicious! (if you like the taste of coffee, that is!)


xxM


Wednesday 16 January 2013

Basic Butter Cookies

Hmmmmn.....I have had a change of mind. A few months ago I wrote about how I'd been searching for a better cookie recipe. The one I'd been using was producing cookies with a very bubbled surface. Not great for decorating. So I was looking for a solution. The recipe I found eliminated that problem - but I think I understand why, now.
The worst air bubbles seem to be on the cookies that have been cut out of re-rolled dough. So, when you gather up the scraps from your first cut-outs, you incorporate air into the dough. The new cookie recipe had a lot of eggs in it - so, it was quite a dense mixture. The problem that I've found with that, is that it isn't bearing up well after re-kneading and re-rolling. It's becoming too...doughy!

So, funny thing: I fiddled with another recipe, and landed up pretty much with what I'd been using originally!!

Now, though, I'm re-kneading with an aim to eliminated those pesky air pockets, and I'm using the right roller ( a heavy stainless steel one, instead of my light fondant roller. What was I thinking??) and smoothing out the surface of the cookie - just as it comes out the oven -with a cake smoother. Thanks to  The Bearfoot Baker for that nugget!

Flat, straight edged, crisp and tasty cookies. I'm happy.


Basic Butter Cookies
recipe by Tea, Cake and Create


250g butter, at room temp.
300g caster sugar
2 XL eggs
620g cake flour
1/2 tsp salt
1 tsp vanilla extract - I use Vanilla Girl vanilla, so just a few drops.
1-2 TBS milk,  if needed

Cream together the butter and sugar
Add the eggs, one at a time, beating on low speed. Add the vanilla.
Sift in the flour and salt. Mix until just clumping, (if the dough seems too crumbly add a dash of milk) then form into a ball by hand. Place in cling-wrap, and refrigerate for 4 hours or overnight.

Roll-out and cut out cookies on a surface dusted with cornflour. (See here for some tips).

Bake at 180'C for 8-10 minutes until the edges are just starting to turn golden.

Decorate when completely cool.

Let me know how this (or the previous) recipe works for you.

xxM

Sunday 13 January 2013

Arum Lily Tutorial

It's Sunday night, so I'm going to make this one short and simple...
In some parts of the world it's considered an invasive weed, but I think it is one of our most elegant indigenous flowers:
Here's a mini tutorial on how to make a mini Arum Lily.

You'll need white and yellow tylose paste, tylose glue, a petal cutter, and a ball tool.


Simple and elegant : )

xxM

Friday 11 January 2013

Vanilla Latte Cupcakes

Sometimes it's about the cake, and sometimes it's just about the icing. And sometimes that's ok ; )


These cupcakes are all about the icing. I used my plane-Jane (no offense intended, Janes!)
basic vanilla cupcake recipe, and then put all the flavour into what went on top...
Ta-da...the Vanilla Latte cupcake ....

I still have no idea what to call this kind of egg-yolk based icing. And if you wanted to use Swiss Meringue Buttercream or just basic butter icing instead, that'll be fine with me : )


Basic Vanilla Cupcake Recipe:
(note: this recipe produces 30-36 cupcakes. The icing recipe, however, is enough for about 12 generous swirls. Freeze the extra cupcakes, use the extra batter to make a small cake, or use it for cake pops...)


4 eggs
2 cups caster sugar

2 cups cake flour
2 tsp baking powder

1 cup milk
1/4 cup vegetable oil
2 tsp vanilla extract

Method:

Set the oven temp to 175'C

Mix the milk and oil together in a jug, and heat in microwave for 2 min on high. Set aside for 15 minutes, then add the vanilla.

Place the sugar and eggs in a mixer, and beat on high for 6 minutes, until pale and fluffy.

Sieve the flour and baking powder into two separate bowls.

Add 1/3 of the flour to the egg mix, then half the milk mix; gently blend. Add another 1/3 of flour, then the rest of the  milk mix; gently blend. Finally add the rest of the flour and then the baking powder.
Mix until just combined.

Use a 1/4 or 1/3 cup measuring cup to fill your cupcake case lined muffin tray.
Bake for 15-18 minutes.

These cupcakes need to be covered with icing as soon as they are cool, or frozen if not used immediately.  Left unfrosted, their surfaces become tacky in a short space of time.


Vanilla Latte Icing

5 egg yolks
1 cup sugar
1/2 cup water
1 tbs good quality freeze dried coffee granules, or instant espresso powder
1 tsp cocoa powder
+1tbs boiling water
Vanilla extract ( I use Vanilla Girl)
Coffee extract (Vanilla Girl) - not essential if you don't have it
250g butter, at room temp., cut into small cubes


Make a paste with the coffee granules,  cocoa and boiling water. Allow to cool

Place sugar and water together in a small saucepan. Bring to the boil. Allow to boil undisturbed for 7minutes on medium heat.
Beat the egg yolks with the whisk attachment until pale and fluffy (about 3 minutes).
Pour the sugar syrup into the yolks, down the side of the mixing bowl.
Keep beating on medium speed until the mixing bowl is neutral to touch.
Swop over to the paddle attachment.
Add the butter one cube at a time, then add the coffee, cocoa mix and extracts. It might go soft and runny....just keep beating.
Beat until the icing is able to hold its shape.

Use immediately.

This icing doesn't like excessive heat. It's a perfect cool, rainy day treat.


Happy baking!

xxM 

Thursday 10 January 2013

Using Cookie Templates

I'm not to sure where this week has gone. I think I'm still in holiday mode, but I have my first 2013 class tomorrow. Yay! Can't wait!

My brain is still two steps behind, though... I was baking cookies in preparation for the class, and could not find one of my large baking trays. So frustrating! It took me two days of random searching to remember that it was in the chest freezer with some cookie-pops-in-the-making. Apologies to my husband and children who I was suspecting of being responsible for its disappearance. Thankfully I didn't voice my suspicions!

The other rather brainless thing I did, was to set a class theme that uses cookie cutters I don't have!
I had ordered them, but not nearly early enough to get them in time for the class. Definitely still in holiday mode...
Anyway, thankfully if you don't have a cutter and it's a simple shape you can use a template instead:

 Draw or print the shape, cut it out of cardboard and baking parchment. Stick the baking parchment onto the cardboard. Then place the template - parchment side down - onto the rolled out cookie dough. Cut around the shape with a sharp knife - and there you have it.


It took me ages to do these, not because they were particularly difficult but because I was cutting them out in 35'C heat, and my cookie dough was turning into goo. I'd cut two, and then have to refrigerate it for 30 minutes to get it firm enough to work with again!
So, use a firm chilled dough when using templates. And a sharp clean knife.

I added the heart as a guideline for piping - my freehand skills aren't great: trying to do something like a circle or a symmetrical shape defeats me. So pressing down with another shape, without cutting all the way through, leaves an impression on the cookie after it is baked. (You can, of course, also draw a guideline with an edible marking pen onto the cookie once it is baked.)


Bake and decorate in the usual way (for a few tips on cookie baking see here; and for decorating basics, here. )


                  Finished birdhouse. It just needs a few blue-birds-of-happiness to complete the picture : )


See you soon!

xxM

Friday 4 January 2013

Kugelhopf


I wish I could tell you that this was a recipe handed down to me by my Austrian Oma, apparently she made a great Kugelhopf - but it's not. She was my paternal grandmother, and recipes aren't things that you can expect Dad's to pass on. No, I tore it out of a magazine. I found it months ago, but didn't bake it straight away because it called for a handheld mixer - which I didn't have; or a rotary mixer - which I've got, but it's useless. I'm sure I could have made a plan with a whisk, but I was holding out for a Kitchenaid hand mixer...and holding out...and holding out...and thank goodness for Christmas, because I got it!!

Here's a picture of it posing next to its friend, the Kitchenaid mixing bowl. So, now I feel that my little Kitchenaid family is complete. Sigh!


Okay, moving along...this is a Kugelhopf (or Gugelhopf) " a splendid Austro-Hungarian cake"!


Kugelhopf
Recipe from UK Homes & Gardens, April 2005

Preheat oven to 180'C
Grease a kugel or bundt tin.

4 eggs
200g white sugar
1 tsp vanilla extract ( I use Vanilla Girl vanilla extract - so just a few drops)
1 tsp almond essence
125g ground almonds
75g cake flour
50g poppy seeds
2 tsp baking powder
1 sachet instant yeast granules
1/4 tsp salt

Use a handheld beater to whisk together the eggs, vanilla, almond essence and sugar in a deep bowl set over hot water. The mixture should become frothy, pale and thick in about 3 minutes of brisk beating.
Sift in the ground almonds, seeds, flour, salt, baking powder and yeast. Mix gently until the ingredients are evenly incorporated.

Bake for 40minutes, or until firm to the touch and a skewer inserted comes out clean.

Leave to cool for 15minutes in the tin, then turn out onto a cooling rack.

Dust with icing sugar before serving.


Guten Appetit!


xxM