
But once my brain's got hold of an idea, it's a bit like a dog with a bone and it doesn't want to let go.
So, here we are - a little late in the day, and a little bit of a rush-job, but it's done:
An Easter Bunny tutorial.

You'll need:
Fondant coloured in two shades - I've used ivory and black gel colours to make a stone colour and grey.
A pinch of black fondant for the eyes.
Tylose powder.
Tylose glue and paintbrush.
A black edible marking pen. The pen's not edible, the ink in it is ; )
Small palette knife.
Small fondant roller.
A piece of dry spaghetti.
Cornflour.

Add the tylose powder to the fondant - 5ml per 250g.
Knead it in well.
Create your basic shapes -

Start with a ball for each.
Roll into a pear shape for the body - achieve this shape by applying pressure with the edge of you hand on one side of the ball of paste only. Place the spaghetti strand in the body - leave approx 1cm sticking out the top.
The head is a similar ovoid shape, just not quite so tapered.
For the upper limbs, start with balls, roll into sausage shapes, but don't apply pressure at one end of the sausage and this will allow it to be a little bulbous for the paw end.
Feet and ears are similar shapes - tapered sausages / long teardrops. Then flatten them by hand or use the roller.
Place the pads of the feet and flatten them down.

Use tylose glue to stick the feet in place; support them while they dry.

Use the glue to stick the arms onto the neck.

Add a little nose to the face and use the end of the paintbrush to make indentations for eyes.
- bulging eyes might be ok for Halloween... but this is Easter ; )
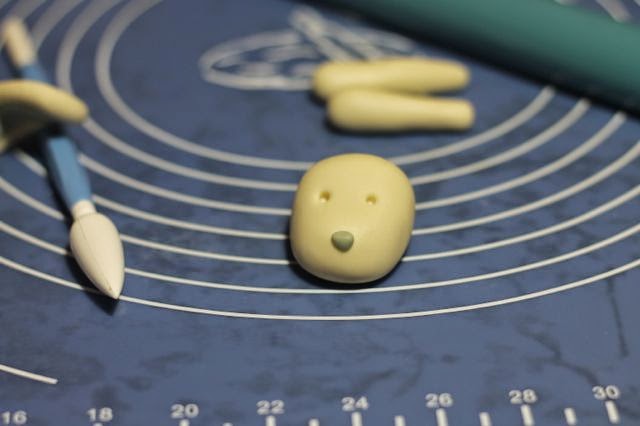
Use a pinch of black fondant to make the eyes - take care to make them the same size.

Put the head onto the spaghetti strand, and position the paws - glue in place. Support if necessary.

Flatten the sausages you made for the ears, and glue them in place.


Add little patches, and draw on the other details with the edible marker once the face is dry.

Happy Easter!
I hope you are blessed with both renewal and abundance.
xxM
No comments:
Post a Comment