Tuesday, 29 April 2014

Dark Chocolate Cupcakes with Salted Caramel Centres

It's good to go away, but it's great to be back home! When we were driving to the airport through the avenue of London plane trees that line the entrance to our suburb, I did wonder were we doing going away at such a glorious time of year in Natal. But sometimes you need to go away to have a proper break (and to appreciate home!). The Cape was lovely, and magical and fresh. Definitely fresh - at least 8 degrees colder than Durban. One of the first things I did when we arrived home was to get out of my jeans and into a sundress. And I can't wait to don an apron and get baking, but I have to catch up on some other work first *sigh*!


So, forgive me for this quick post: it's nothing entirely new. You've seen the separate elements before, but the combination is one that I haven't published yet, and I hope that's ok with you!
 : )

Dark Chocolate Cupcakes with Salted Caramel Centres


 Dark Chocolate Cupcakes
adapted from the Hershey's chocolate cake recipe. 

Preheat the oven to 180'C
Prepare 2x 12hole muffin trays with cupcake cases. (Plus an extra 6 if you aren't using larger "American"-style muffin cases) 

2 cups cake flour
2 cups caster sugar
3/4 cup cocoa powder
1/2 tsp baking soda
1/2 tsp baking powder
1 tsp salt 
1/2 cup vegetable oil
1 cup buttermilk
2 eggs, lightly beaten
1 cup boiling water 
1tsp vanilla  extract 

Sift all the dry ingredients together. Whisk to combine. 
Make a well in the centre, and pour in the eggs, buttermilk, oil and vanilla. 
Mix well. 
Add the boiling water. Mix until combined. 

Pour into the prepared cupcake cases - do not fill more than halfway! 
Bake at 180'C for approx 20min, or until a skewer inserted comes out with a few moist crumbs clinging to it. 
Remove cupcakes from muffin trays and cool. 


Caramel sauce.

1/4 cup water
1 cup sugar
1/3 cup butter
1/2 cup fresh cream
Sea salt crystals.

Place the sugar and water in a medium sized heavy-bottomed saucepan.
Stir over medium heat until all the sugar has dissolved.
Brush the side of the saucepan with a damp brush often to remove any sugar crystals clinging there.

Bring the mixture to the boil. Leave to boil on medium-high heat until it is a rich amber colour. Don't stir - just swirl the saucepan occasionally. (Watch it carefully - once the colour starts to change it can rapidly go beyond "amber" , the sugar will burn and the caramel will be bitter).  

Once the sugar has turned amber, add the butter and stir until it has melted completely. 
(The mixture will froth up dramatically!)
Remove from the heat, wait a few seconds then add the cream. The mixture will froth up again.
Mix until smooth.
Grind in the sea salt - how much depends on personal taste. 

Allow to cool.


Use a long, narrow plain round tip to pipe the caramel sauce into the centre of the cooled cupcakes.


Chocolate Mousse Icing
Recipe by Tea, Cake and Create

(Enough for 2 dozen cupcakes) 

150g butter, at room temp
1 1/2 tubs cream cheese (375g), cold from the fridge. NB use a dense cream cheese like the Woolworths brand or Lancewood. 
1/2 cups sifted icing sugar 
1/2 cup unsweetened cocoa powder, sifted
1 tsp vanilla extract

Use an electric mixer  to beat the butter until pale and soft before adding the icing sugar.
Beat the icing sugar and butter together. 
Add in the cream cheese, vanilla and cocoa. Mix well. 


 Ice the caramel filled cupcakes once they are completely cool. 


Happy baking! 

xxM 

Wednesday, 23 April 2014

Date and Nut Brownies


So, do you have any Easter eggs left over? None?
Hey, no judgement - just asking!
But if you did squirrel away some of your kids' Easter stash (obviously to spare them the perils of all that sugar, and not for your own personal use…!) here's a way to use up some of that chocolate:


Date and Nut Brownies
Recipe by Tea, Cake and Create

Preheat the oven to 180'C
Grease and line a brownie baking pan.

Ingredients:
400g chocolate - broken into small even-sized pieces
50g butter
80g flour
100g pitted dates, finely chopped
50g pecans, roughly chopped
50g hazelnuts, roughly chopped
100g caster sugar
3 eggs
1/2 tsp salt
1//2 tsp ground cinnamon
1tsp vanilla extract


Melt chocolate and butter together (use a double boiler or the microwave on low power.)
Set aside to cool.

Beat the eggs and sugar together until pale and creamy.
Pour the cooled chocolate into the egg mixture. Add the vanilla extract. Beat on low speed until incorporated.

Sift in the dry ingredients. Mix briefly.
Fold in the dates and nuts.

Pour the batter into the prepared brownie pan and bake at 180'C for approx 35min - a skewer inserted into the centre of brownies should come out with sticky crumbs stuck to it.


Allow to cool before cutting into squares and serving. (Remember to share with your kids!)


Enjoy!

xxM


PS. If you're looking for other sorts of brownie recipes - you'll find them here.

Sunday, 20 April 2014

Easter Bunny Tutorial

It was only after I completed this little fella, that I thought - Dang! I should have taken some photos to do a tutorial. And then we were off and away for the Easter weekend, and it seemed too late.
But once my brain's got hold of an idea, it's a bit like a dog with a bone and it doesn't want to let go.
So, here we are - a little late in the day, and a little bit of a rush-job, but it's done:

An Easter Bunny tutorial. 


You'll need:
Fondant coloured in two shades - I've used ivory and black gel colours to make a stone colour and grey.
A pinch of black fondant for the eyes.
Tylose powder. 
Tylose glue and paintbrush.
A black edible marking pen. The pen's not edible, the ink in it is ; )
Small palette knife.
Small fondant roller.
A piece of dry spaghetti.
Cornflour.


Add the tylose powder to the fondant - 5ml per 250g.
Knead it in well.

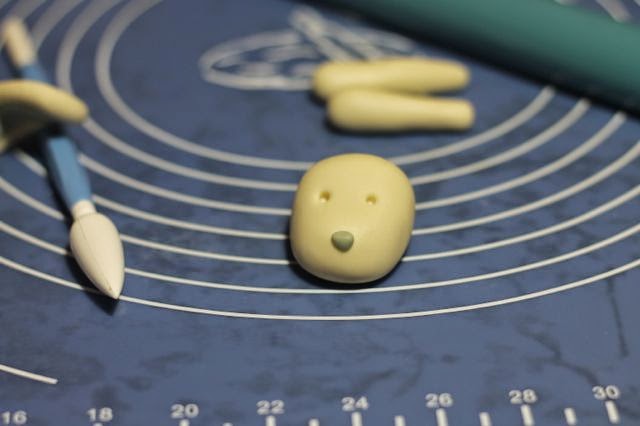
Create your basic shapes -


Start with a ball for each.
Roll into a pear shape for the body - achieve this shape by applying pressure with the edge of you hand on one side of the ball of paste only. Place the spaghetti strand in the body - leave approx 1cm sticking out the top. 

The head is a similar ovoid shape, just not quite so tapered. 

For the upper limbs, start with balls, roll into sausage shapes, but don't apply pressure at one end of the sausage and this will allow it to be a little bulbous for the paw end. 
Feet and ears are similar shapes - tapered sausages / long teardrops. Then flatten them by hand or use the roller. 


Place the pads of the feet and flatten them down.  

Use tylose glue to stick the feet in place; support them while they dry. 


Use the glue to stick the arms onto the neck. 


Add a little nose to the face and use the end of the paintbrush to make indentations for eyes. 
- bulging eyes might be ok for Halloween... but this is Easter ; )

Use a pinch of black fondant to make the eyes - take care to make them the same size. 

Put the head onto the spaghetti strand, and position the paws - glue in place. Support if necessary.


Flatten the sausages you made for the ears, and glue them in place. 


Add little patches, and draw on the other details with the edible marker once the face is dry. 


Happy Easter! 
I hope you are blessed with both renewal and abundance. 


xxM 

Sunday, 13 April 2014

Double Caramel and Banana Cupcakes

Living in Kwazulu Natal, bananas are always available in abundance. Their presence in the pantry is automatically assumed. And on the rare occasion that the children (ours) and the monkeys (not ours) have managed to deplete the stores, we could go and simply forage for more down in the valley. Except we don't, because that would entail navigating locked gates, barbed wire, electric fences, and snakes…
Ah, life in Africa!

These cupcakes were made after one of my husband's patients gifted us with a couple of hands of bananas from their tree (and yes, they still have to pay their medical bill with real money!).

I took a recipe that I posted a while back, changed it slightly and added the caramel: caramel chunks and caramel sauce crammed into the centre of the cupcake. I'm on a bit of a caramel kick at the moment...


Double Caramel and Banana Cupcakes
Recipe by Tea, Cake and Create

Preheat the oven to 180'C
Line 2 muffin trays with cupcake cases (makes 20-24)

320g cake flour
200g light brown sugar
2 tsp baking powder
1/2 tsp ground cinnamon
3 medium bananas, mashed
3 large eggs
125 ml vegetable oil
1 tsp vanilla extract
125 g caramel chunks - I used roughly chopped caramel creme's
60g pecans, finely chopped

Beat the eggs and sugar together until light and fluffy.
Add the oil, vanilla and bananas and mix to incorporate.

Sift in the dry ingredients, mix briefly; then fold in the caramel chunks and pecan pieces.

Spoon into the prepared cupcake cases and bake at 180'C for 20 minutes or until a skewer inserted comes out clean.

Remove from the muffin pans and allow to cool on a wire rack.


Caramel sauce.

1/4 cup water
1 cup sugar
1/3 cup butter
1/2 cup fresh cream


Place the sugar and water in a medium sized heavy bottomed saucepan.
Stir over medium heat until all the sugar has dissolved.
Brush the side of the saucepan with a damp brush often to remove any sugar crystals clinging there.

Bring the mixture to the boil. Leave to boil on medium-high heat until it is a rich amber colour. Don't stir - just swirl the saucepan occasionally. (Watch it carefully once the colour starts to change, as it can go from amber to burnt very quickly and you'll land up with a bitter caramel!)

Once the sugar has turned amber, add the butter and stir until it has melted completely.
(The mixture will froth up dramatically!)
Remove from the heat, wait a few seconds then add the cream. The mixture will froth up again.
Mix until smooth.
Allow to cool.


Use a long, narrow plain round tip to pipe the caramel sauce into the centre of the cooled cupcakes.


Cream Cheese Icing

250g tub cream cheese - the denser kind, like Lancewood or Woolworths low fat cream cheese, or Philadelphia
100g butter, at room temp.
3/4 cup sifted icing sugar
1tsp vanilla extract

Beat the icing sugar and butter together until soft and creamy, then add the vanilla and cream cheese. Beat until just combined. Pipe onto the cooled cupcakes. 

(Note - this quantity of icing was enough to cover the 2 dozen cupcakes with the swirls pictured above, but for larger icing swirls you may need a double batch of icing.) 


Happy baking! 

xxM 

Saturday, 12 April 2014

Jem Cutters Lace Butterflies


Sho-eee! I'm getting to the end of what's been a very busy two months; and I've been aware over the past week of how little attention I've paid to the TC&C Facebook page. But it got me thinking - how good a reflection of our lives is Facebook, really? I mean, here I am in the midst of a crazy-busy period and my presence (or lack thereof) on FB suggests hibernation. Now, I do think that selective posting is a good idea (the world doesn't need to know about everything in your life, surely?) but often people only post things that are either very good or very bad, and sometimes I think that gives us a very skewed idea of reality. And sometimes, I just look at posts and think Really? Is that for real life or your Facebook life? (No - not you, never you!!)

Any-hoo... That's got nothing to do with this post; except that these cupcakes were made for a friend who saw pictures of some of my bright and colourful rainbow cupcakes on FB, asked for something similar, and this is what she got.
Huh?! Ok, it's a long story which I'll share when the official photos are out.


I was going to do a photo tutorial on how to make the butterflies (using Jem's lace butterfly cutters)…


Which I find quite fiddly to use, but some of the real professionals have already done a great job of doing a YouTube video tutorial.

Here's the link:

http://m.youtube.com/watch?v=kiBZwFUn80o

Happy decorating!

xxM

Friday, 4 April 2014

Then and Now: Couture Cupcakes

Have I ever told you how awful the first birthday cake I made was? It was for my son's second birthday  and I had no idea how to ice cakes, but figured that it couldn't be too difficult. We--ell!
I've suppressed the memory, but I shed a lot of tears of frustration that night. A lot.
I can't even find a photo of it - it was so bad that my husband couldn't bring himself to take a picture. Cake wreck. Really.
Now, I still don't see myself as a hot-shot cake decorator, but I'm generally content with the outcome, and take a few photo's to boot!

So, just as a Friday-night-funny, I thought I'd show you a then-and-now of "couture" cupcakes that I've done. The black and white set is from the past week, and the others are from 2 years ago.
(I actually thought that they were quite good at the time!)


 Then:


Now: 


Yes, there's still room for improvement - but at least I can look at the photos and not cringe! 

: ) 

xxM