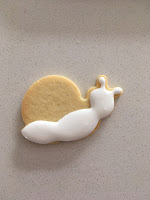
They have the prettiest swirls of icing or meringue on their backs.
Who wouldn't want to live in a meringue shell, I ask you?!
Except in late summer in Durban - those meringues would melt before midday!
I decided to make the shells out of marshmallow, instead.
The first batch of marshmallows I made using this corn syrup-free recipe - which is gorgeously soft and gooey.
But because these cookies were being packaged and sent off to school, I opted for a slightly sturdier result, and used the recipe below.
A candy thermometer is required, unfortunately - it's not a recipe where you can guesstimate temperatures.
Marshmallow Swirls
Recipe adapted from Ina Garten
Prepare 2-3 large cookie trays with parchment paper or silicon baking sheets liberally dusted with the icing sugar/ corn flour mix.
Ingredients:
20g powdered gelatin
300g caster sugar
120ml + 120ml cold water
250ml liquid glucose (or corn syrup)
1/4 tsp salt
1 tsp vanilla extract
Gel food colour
1/4 cup icing sugar + 1/4 cup corn flour - for dusting
Method:
In the bowl of a stand mixer, combine the gelatin with 120 ml cold water, and put aside.
Combine the sugar, liquid glucose, salt and remaining water in a small saucepan and stir over medium heat until the sugar has all dissolved.
Raise the heat to medium-high and allow to boil undisturbed until the syrup reaches 114'C / 240'F on a candy thermometer.
Carefully pour the sugar mixture into the gelatin and beat with the whisk attachment on low speed.
Slowly increase the mixer speed.
Add the food colouring and vanilla extract.
Continue to beat on high speed until the mixture cools down and becomes thick and fluffy.
Spoon the marshmallow into a piping bag prepared with a large closed star tip (e.g. an Ateco 852).
(It's a sticky job, and you don't want to try refill the piping bag, so make sure you use a bag large enough to hold all the marshmallow to begin with!)
Pipe swirls of marshmallow onto the prepared cookie trays.
Allow the marshmallow to set overnight.
Dust the tops with remaining icing sugar/ cornflour mixture to cover any surface stickiness.
The rest of the cookies are very simple - Outlne and flood the snail body; allow to dry.
Draw or paint on the face.
Use a little edible pink powder for the cheeks.
Attach the marshmallow "shell" to the cookie with royal icing.
Cute little critters aren't they?
I'm not sure who first thought of a swirl-for-a-shell, but I was inspired by the cookies of @pryanichnaya_lavka, a very talented Russian artist - look her up on Instagram.
Happy decorating!
xxM


No comments:
Post a Comment