Sunday, 19 December 2021

Christmas 2021

 Don't you just hate it when bloggers you follow just vanish? No explanation. Poof! Like that last slice of cheesecake you tucked away behind all the turkey leftovers in the fridge....

When I wrote that last post - January, 2020 - I knew that I had wrapped up Tea, Cake and Create decorating classes (with work and family commitments, classes had simply become to much to juggle). But I honestly expected to continue to bake and post recipes on the blog. Then 2020 happened and ...well, you know. 2020. 

I started out with a diary of lockdown days on Instagram, and then that grew a little tedious.  At that point we were still working (both my husband and I are in the medical field) and although we weren't at the frontline of Covid-care, other hospital responsibilities continued. The kids were at home. A year later, now they are nearly-12 and a solid thirteen; it isn't as daunting an idea as it was back then, but leaving two pre-teen children alone at home while we went to deal with medical emergencies left me with a constant pit in my stomach. I think, for me, that was the greatest lockdown challenge.  (I am very aware that many, many families have had much greater difficulties to face over the past two years.) Then there was the cleaning. Endless cleaning. Endless snack-making. And that was even before we had to start distance-learning/home-schooling. 


So, any baking I did became purely functional. No frivolity. That's not to say no joy - because the time that we spent in isolation was also very special. Life simplified and streamlined.  Since then, I have not managed to bring myself back into the fast-flowing stream of social media. 


While I have picked up my piping bags again recently, it has been a relief to be able to bake and not feel the need to document, photograph, photoshop, post. 

Do you sometimes wonder if Facebook, Instagram, Twitter don't take more than they give? Do they rob us of the moments of joy? 


Anyway... I don't know if you have missed me or these posts - I have certainly missed so many of you! Know that I think about you often -  all my class regulars that became such a special part of my Friday and Saturday mornings. (You know who you are!)  


While I won't make any promises about being back here soon ... I'd like to believe that I will occasionally visit with you. 


I wish you well! Have a wonderful festive season, and all the very best for 2022! 


xxM 


Sunday, 26 January 2020

Strawberry and Nutella Meringues

Clouds of flavour ... that's how I'd describe these. 
And I'd have to admit that I am usually not a big fan of meringues,  but these have just enough crunch, just enough chewiness, and just enough tartness to make them quite delicious.   
They are good, really good. 
Pair them with ice-cream and fresh berries, and you'll have an easy yet impressive dessert. 


When I made the first batch, I only had 2 fresh eggs in the house. This was just before Christmas, where you avoid going to the shops at all costs. 
So I made up for the absent egg by reconstituting meringue powder with warm water. I've made meringues with just meringue powder before, and while very convenient - I wasn't convinced about the taste.  This combination though, definitely works. 
I repeated that with the second batch, using 2 eggs and 1 tablespoon re-hydrated Actiwhite (our local meringue powder brand). The original recipe called for 3 egg whites - which I'd say go ahead and use, if you don't have meringue powder. 


Strawberry and Nutella Meringues

Preheat the oven to 135'C
Line 2 large baking sheets with parchment paper
Prepare a piping bag with a large plain round tip

Ingredients 
3 egg whites (or 2 egg whites + 1 tbs meringue powder dissolved in 30ml warm water)
150g caster sugar
30ml icing sugar
1 tsp vanilla extract
1/2 tsp white vinegar
1/3 cup Nutella
1/3 cup Strawberry preserve

Beat the egg whites with an electric mixer, on high speed, using the whisk attachment.
When the egg white starts to form soft peaks, slowly  add the sugar and icing sugar while continuing to beat.
Beat in the vanilla and vinegar.
Beat until meringue is glossy and stiff.


Prepare a piping bag with a large plain round tip. In the inside of the piping bag, paint stripes of Nutella and strawberry jam/ preserve. If the Nutella is too firm, soften it by heating gently.

Place the meringue into the piping bag, and pipe swirls onto parchment-lined baking sheets.

Bake at 135'C for 30minutes, then turn off the heat and leave the meringues in the oven with the door closed for an hour.


Half the second batch I made was put into a container with the meringues nestled between parchment paper, and buried in the depths of my fridge.  A month later they're still good. Freezing them is also and option. Just make sure that the meringues don't come into contact with humidity, and they'll have a long shelf life. 


Happy baking!

xxM

Saturday, 25 January 2020

Salted Caramel Cheesecake

I may or may not still be catching up with posting the festive season recipes...
Ok, full disclosure - I am still catching up. But whoa - slow down 2020!
 I thought that taking a sabbatical from classes would give me a little more time this year, but so far all gaps have just been filled up with other demands (admittedly, I have given myself a bumper list of things to tackle in the next 12 months!)

This cheesecake was made for a pre-Chritmas Christmas dinner with friends.
I use my standard cheesecake recipe and just change it up a bit for the different flavour versions.


Salted Caramel Cheesecake

Prepare a springform pan with non-stick spray and parchment.

Ingredients:
Base
180g chocolate cookies
60g melted butter

Break the cookies into small pieces, then use a food processor to blitz until finely crumbed.
Mix with the melted butter, and press the mixture firmly into the base of the pan. 
Chill in the freezer for 30minutes. 

Filling
Preheat the oven to 160'C

2x 250g tubs cream cheese at room temp.
120g caster sugar
250ml sour cream 
4 eggs
1tsp vanilla extract
100g salted caramel *


Beat the cream cheese and sugar together until smooth.
Beat in the cream and vanilla extract.
Add the eggs one at a time. Beat well in between additions.
Mix in the salted caramel. 
Pour onto the chilled base. 

*I used the salted caramel from this recipe. I often have a jar in my fridge - it keeps really well, and is handy for these recipes, or simply to use between cake layers, on ice-cream , cupcakes, etc. 

Bake in a water bath at 160'C for 60-70 minutes, or until just the centre of the cheesecake jiggles when gently shaken.
 Leave to cool in the oven with the door slightly ajar.
Once cooled, refrigerate for 4 hours or overnight


Ganache:

240g dark chocolate - chopped into small even sized pieces.


120ml fresh cream (35-40% fat content)

Melt the chocolate and cream together in a double boiler. 
Once most of the chocolate is melted, stir until smooth. 
Leave to set until it has an easy spreading consistency. 

When the cheesecake has chilled, spread the chocolate ganache on the top and smooth. 
Place back into the fridge for 30 min before serving. 


Before serving, decorate the top of the cheesecake with chunks of caramel and shavings of Lindt dark chocolate with salted caramel  .


As a little addendum....


I also made a Nutella swirl cheesecake for Christmas. In brief:
Use the above recipe, omit the salted caramel.
After pouring the batter into the base,
warm 1/3 of a cup of Nutella so that it is softer. Use a piping bag with the tip cut off to pipe concentric circles of Nutella into the batter. Drag the Nutella inwards using a cocktail stick.
And bake!

So I know that these instructions are wholly inadequate.  But I'll add a video of the technique as soon as I have an opportunity to bake this again.

Happy baking!

xxM

Tuesday, 31 December 2019

Christmas Cookies Part 2

And then there was one! One day left of 2019, and still so many things to do before the end of the year!
In all reality, most of them can wait. But not this last post on Christmas cookies.
 It would be anathema to me to be talking Christmas after the 1st of Jan (yes, the tree is already down and all the ornaments are packed away. We start the New Year  without having the depressing business of clearing up Christmas decorations hanging over our heads. And by we, I mean me - because while the kids are at the age where they gladly decorate the tree, they sure as heck aren't going to help un-decorate it.)

I promised (you may not have noticed, but it didn't slip my mind) that there was a part two to the Christmas cookies from 2019, so here it is...


I constructed the gingerbread men out of a standard gingerbread cutter and a pocket watch cutter - see this post for the technique: http://teacakeandcreate.blogspot.com/2019/11/halloween-zombling-cookies.html


One of my favourites was this tree with the tangled lights, but if you want an even simpler design, try this one: 
(triangular christmas tree from Treat Boutique.)


Aaaand that's a wrap for Christmas 2019 (and for 2019!)


See you in 2020 ;-) 

xxM 

Tuesday, 24 December 2019

Christmas Cookies 2019

Ok, so I might just be avoiding today's real task of cleaning the house and cooking Christmas Eve dinner But it is also important to get these cookies logged before Christmas 2019 comes and goes, right?!


This was the first time I made Santa and Mrs Claus cookies for a class - I've avoided them before because it's a whole other colour to consider, but I justified making flesh colour by using it for Rudolph's snout too:


I know that some gel colour ranges have a copper colour that works well for skin tones, however
I always use a mix of soft pink and ivory - because that's what I've got! And if you need to neutralise it a little - if it's looking too pink - add a tiny drop of black 


I have more Christmas cookies for 2019 to share - but those pic's are a  different colour scheme, so obviously they require a separate post!

See you then!

xxM 


Christmas Trifle with Champagne and Panna Cotta

Is Christmas Eve a little late to be posting suggestions for Christmas dessert?
It is - especially if, like us, you celebrate on the evening of the 24th!
But there's always next year...


I made this trifle for a celebration dinner we had with friends last week,  because it has been ridiculously hot and a light trifle seemed like the perfect dessert.
The other reason I made it pre-Christmas, is because I know that the family we have coming over this  evening would far rather have cheesecake than trifle....
So  of course I've made a cheesecake (it's a Nutella swirl cheesecake to be precise. I guess I should share that recipe too?!)

But this trifle went down really well, so it is something that I will make again.


Here's a little video that I put together as a summary of the process. 
A couple of additional notes:

 - I used a small cake that I had in the freezer, made with the hot milk vanilla sponge recipe that I use for  basic cupcakes - it makes a great light sponge cake, so it's not just for cupcakes. 
- any vanilla sponge cake or pound cake will do, even un-iced cupcakes. 
- I used a small squeeze bottle to drizzle the champagne over the sponge cake. The cake was moist, not sloshed!
- use this yoghurt panna cotta recipe and omit the berries
-the panna cotta has to be made in two batches because it sets (which is what you want it to do!) , but that does mean you can't put aside half the batch to pour in for the second layer. 
- if you aren't comfortable halving the panna cotta recipe for a small trifle, then pour the remainder of the panna cotta into small glasses and top with berries for extra desserts. 


I hope the rest is  sufficiently explained in the video, if not - feel free to comment with questions below!


Now I need to go and sort out that cheesecake!

Happy Christmas Eve. 💕

xxM


Friday, 8 November 2019

Rainbow Spectrum Cupcakes


Why is it that rainbows make us happy?
We could go scientific and speak about the wonder of prisms reflecting and refracting light.  We could go deep and philosophical and speak about how rainbows symbolise hope and renewal when they appear with the calm after a storm. And that is all true.
But I think our delight in rainbows is simply the  magic of revisiting our childhood excitement at the words - look! there's a rainbow.  It's an ingrained joy.


Now,  what is not a joy is a kitchen full of buttercream, right?
And these cupcakes look like a lot of work, don't they? Imagine all those mixing bowls and filling all those bags with the different coloured icing!

Would you believe me if I told you I only used two bowls and one icing bag and nozzle?!

Believe me!

Here's how to make Rainbow Spectrum Cupcakes... 

Place a small amount of uncoloured buttercream in a bowl (enough to pipe approx. 3 cupcakes).
Add a drop of yellow gel colour. 
Put this yellow icing into a disposable icing bag fitted with the nozzle of your choice.
Pipe three rosettes. 
Return any left over icing to the bowl, and top up with a couple of spoons of plain icing. 
Add a drop of blue colour to the icing, and a drop of green. 
You should have green icing. 
Put this into the same icing bag that you used before. Pipe rosettes. The first couple will have a little bit of yellow on the outsides of the swirls - lovely!
Return any left over green icing to the bowl, and top up with more plain icing. 
Add more blue colour. You'll now have turquoise icing. Put this icing into the bag... 
you're getting the picture?!
You'll probably do one more blue - make it a pure blue, don't use the left over turquoise in this batch. 
After the blue, you are going to add pink gel colour to your bowl of icing (leftover blue, topped up with plain icing) - pink and blue mixed together will make purple. 


Add a little more pink to the icing for the next round, to get a pinker purple. 
After the purple, it's time to change bowls. Discard any leftover purple icing, you'll want a true pink next, but still use the same icing bag. 

...can you see how using the same icing bag adds to the effect? Each of the previous colours can be seen as a trace on the next shade. 


The magic of the colour spectrum... it's really the magic of science!

Happy baking 💕

xxM 

Thursday, 7 November 2019

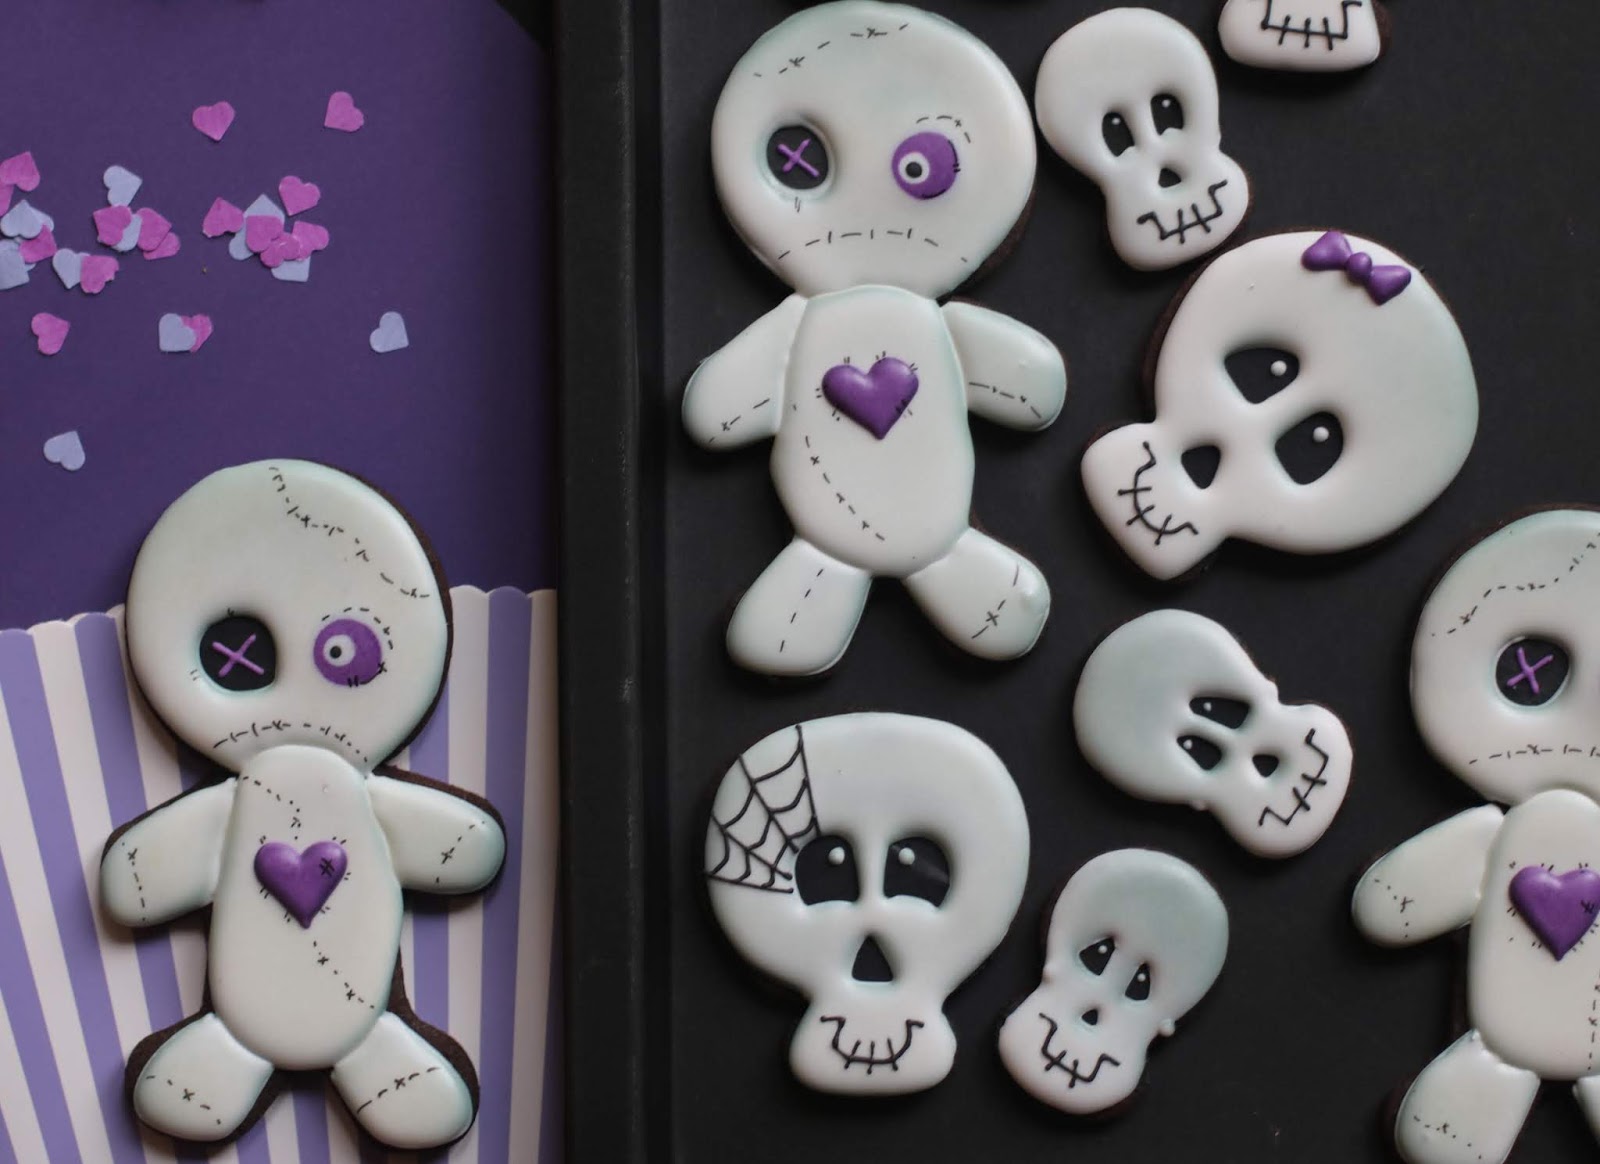
Halloween Zombling Cookies

I called these cookies Zombies, but my son pointed out that they're not - they're more like voodoo doll cookies aren't they? But that idea creeps me out a little too much (i'm not sure why - 'cos I'm not overly sensitive to ghoulishness!).
So I'm calling them zomblings, ok?
Ok!


What I didn't mention when I posted the Sugar Skull Cookies on Instagram and FB, was that those stunning skull cutters, were custom made for me by Treat Boutique. 
Lauri and Brad are always so happy to accommodate my requests for new designs!
But I thought of making these Zombling characters at the last minute, so instead of asking for another new custom design, I created them out of two of Treat Boutiques other cutters instead. 

This is the gingerbread man, and can you guess the other one?


It's a pocket watch - made when we did Alice in Wonderland cookies a few years ago! 


Merge the two cookies together, and bake. 


And look how those cut out bits didn't need to be discarded, they made perfect mini skulls!


Now that's good magic, huh?!


Happy baking!

xxM 


Friday, 1 November 2019

Halloween Cookies 2019

Well, now.... I'm just about a decade behind on cookie posts. But you've seen the clips on Instagram and Facebook, haven't you?
It's been hard to keep up with everything this term. Just this morning I was fantasising about self-driving cars - I could just send the car to fetch the kids from school. But then I'd miss out on that flow of information that comes out when they get in the car. And the chance to connect with other mom's while we're waiting for the children to come out.
There's a new show on Netflix called Living with Your Self. In a Netflix-nutshell, it's about a man who inadvertently clones himself. It gets complicated. But  there's two of him! I could do with another me!
Maybe even three ... one to bake, one to work, one to parent.

Anyhoo...! That's what weekends are for, time to catch up a little. So I may not catalogue all the recent classes. But sticking with the realm of fantasy, let's start with the latest:


Here's the video.....


And here are some of the sugar skulls we decorated ....


and a video for the roses ....


 I decorated more Halloween themed cookies this year than I usually do - many more. I had a lot of purple that I needed to get out of my system.

Which I did....


Happy decorating!

xxM


Wednesday, 2 October 2019

Chewy Chocolate Ginger Cookies

If I'm baking cookies these days that aren't for the classes, you must know that it's not me behind the sieve.
My daughter loves baking. (Don't know where she gets it from). And during the school holidays she was determined to make cookies.  I gave her one of my simplest recipes to make completely solo - these three ingredient peanut butter cookies - which she very capably did.
But her brother was super unimpressed because he claims to be allergic to peanuts (he's not). He insisted that we make more cookies just like those, but without peanut butter.
So we made these... chewy on the inside, crunchy on the outside, lots of flavour - but not peanut butter!


And when you're baking with kids, you add chocolate wherever possible, right?
You can omit the chocolate if you want to - the original recipe was just ginger - or you can add even more! Details below...**


Chewy Chocolate and Ginger Cookies

Preheat the oven to 180'C
Prepare 2-3 large cookie trays / baking sheets with baking parchment.
Makes 25-30 cookies, depending on the size you roll.

Ingredients

200g brown sugar*, plus extra for rolling
180g butter, at room temp.
1 egg
30ml golden syrup

300g cake flour
1 tsp baking soda
1tsp ground cinnamon
2 tbs ground ginger
1/2 tsp salt
100g dark chocolate, grated

*  ideally use 100g light brown sugar, and 100g treacle sugar
** for a more chocolatey experience, omit 20g flour and add 30g unsweetened cocoa.
 

Cream together the butter and sugar. Add the egg. Mix well. Beat in the syrup.
Sift in the dry ingredients, followed by the chocolate. Mix until just combined.

Shape the dough into small balls (approx 3cm diameter), then roll those in sugar.
Place on cookie trays - well spaced - and flatten  gently with a fork.
Bake at 180'C for 8 minutes
Remove from the oven and allow to cool on the baking sheet before taking off from the trays.
The cookies will be soft at first, then crisp up as they cool.


I'm going to give these a bash with oats and coconut too sometime, I'll let you know how that turns out.

Happy baking!

xxM

Friday, 30 August 2019

Chocolate, Pecan and Orange Babka

I have a whole Pinterest board dedicated to Things to Bake. And there are many many things to bake in this world. Usually I just land up baking the tried and tested, because I don't have time for untried and untested.
 But sometimes I do.
 For last weeks class, I made  chocolate and raspberry panna cotta.
The plan B if those weren't a success was this chocolate babka - a recipe that I'd pinned a while back.


So, I'm sorry last-week's-ladies ... if you'd rejected the panna cotta, you'd have had the opportunity to sample this instead.
And you really should try it - I don't care who you are or where you live - you need chocolate babka in your life. (Unless you're gluten intolerant. Then you definitely don't. And there isn't a gluten-free version. Sorry!)
You'll just have to bake it yourselves. But I'm going to help.

So here's the original recipe...

http://milk-and.blogspot.com/2015/10/chocolate-hazelnut-cinnamon-babka.html

 I just changed a couple of things - replacing hazelnuts with pecans, and adding some orange zest. Because dark chocolate and orange in a loaf together are beyond delicious.


Chocolate, Pecan and Orange Babka

Ingredients:


Dough:


1 sachet instant dried yeast

320g white bread flour
40g caster sugar
1pinch salt
1 egg, lightly beaten
80ml lukewarm milk
90g butter, cut into cubes


Chocolate  Filling:


100g  butter

180g caster sugar
80g dark chocolate, chopped
40g cocoa powder
1 teaspoon ground cinnamon
100g chopped pecan nuts 
zest of one medium orange (squeeze out the juice after zesting, you'll use it for the syrup below.)

Sugar Syrup:


50ml water 

50ml orange juice
100g caster sugar


Method:

Dough:

Place the flour, dried yeast, salt and sugar together in the bowl of a stand mixer fitted with a dough hook. Mix briefly to combine the ingredients. 
Heat the milk until just lukewarm. Add the cubed butter into the milk so that it softens slightly. 
Pour the milk and beaten egg into the flour mixture. 
Knead with the dough hook  on low speed until the dough is smooth. Add more flour if the dough is too sticky. 

Filling:


Melt the butter and chocolate together. Mix in the sugar, cocoa, cinnamon and orange zest. Set aside. 


Sugar Syrup:


Place the ingredients together in a small saucepan. Simmer over medium heat until the sugar has dissolved. 
Allow to cool.


Assembly:

Grease and line a large loaf pan with baking paper. 
Punch down the risen dough. 


Place on lightly floured surface and roll out into a rectangle, approximately 50cm x 30cm.  
Spread the filling over the dough, all the way to the edge. (If the filling has set, microwave / heat it briefly so that it is easy to spread.)
Sprinkle with the pecan nuts. Starting from the long edge, roll up tightly into a long sausage. 
Slice down the length of the dough. Twist the two strands over each other making a large plait.  
Fold the plait in half - bringing the two ends next to each other. Place it into the prepared pan.  
Cover with cling wrap and leave to rise in a warm spot until risen, approx 1 hr. 


Preheat the oven to 180'C, thermofan on.  

Discard the cling wrap,  and bake the babka for approximately 30minutes, until the dough is a light golden colour. 

Remove from the oven and pour the syrup over the hot loaf.  (Do not omit this step, it adds moisture and flavour to the finished product). 

Leave to cool completely in the loaf tin before serving. 


Why stop at one slice when you can have two?!

Happy baking!

xxM 


Saturday, 24 August 2019

Raspberry and Dark Chocolate Panna Cotta


My mother was from a generation when you had to own a cheese platter and a punch bowl if you entertained. 
Cheese platters have been replaced by beautiful organic cheese boards, but if a flat, round, frosted glass plate came to mind when I first mentioned  "cheese platter" - you're probably a child of the 70's like me!  


So, when was the last time you had punch out of a punch bowl?!  At a retro party perhaps. Although, "retro" now means 80's, doesn't it - we'll have to start saying vintage parties to mean the 70's! 

Anyway... the point is, if you've had a beautiful glass punch bowl handed down to you - use it:  the cups make great dessert bowls!


Raspberry and Dark Chocolate Panna Cotta 


Depending on the portion sizes you're serving, you'll need 10-12 glasses or small jars.  
These punch cups are 120ml volume. 
 For the tilted effect, place the glasses / jars in a muffin tray with a little bit of kitchen towel supporting them. 
Use a small measuring cup to get equal volumes into the glasses (1/4 cup measure, is what I used. But it’ll depend on the size of your glasses). 


Dark Chocolate Panna Cotta Laye

1 sachet gelatin powder (10g) 
120ml full cream milk

80g caster sugar
Pinch salt 

200 ml full cream milk 
200ml cream (heavy/ whipping cream - 35% fat content) 
200g dark / semi-sweet chocolate, chopped
20g cocoa powder 
1 tsp vanilla extract 

Pour 120ml milk into a small saucepan. Sprinkle in the gelatin powder. Stir. 
Leave to sit for 10 minutes. 

Heat together the cream, milk and dark chocolate.  (Use another saucepan over low heat, or microwave in 30 second bursts, stirring in between.) Heat until the chocolate has melted. 
Pour out about 1/4 cup (60ml), and stir the cocoa powder into this to make a paste. 
Return the paste to the chocolate/ milk and cream mixture. Stir well. Add in the vanilla. 

Add the sugar and salt to the gelatin ⁄ milk in the saucepan. 
Heat gently, until the sugar and gelatin have dissolved. Do not overheat, the milk should only be lukewarm! 

Pour the chocolate mixture into the gelatin mixture. Stir well. 

Pour into the prepared glasses or jars. 

Place in the fridge until set. (1 hour) 


Only prepare the next layer once the chocolate layer has set.  
In the meantime, make the raspberry reduction** 


For the raspberry panna cotta, use a homemade raspberry reduction**, or a good quality raspberry preserve. Another alternative is to simply puree fresh raspberries. But I'd still be inclined to add a little sugar to the puree, and simmer on the stove until some of the liquid evaporates (in other words - make a reduction!)

**Raspberry Reduction:
350g frozen raspberries 
100g caster sugar 

Simmer in a small saucepan until thickened / reduced.  

Raspberry Panna Cotta Layer 

1 sachet gelatin powder (10g) 
120ml full cream milk

80g caster sugar
Pinch salt 

200 ml full cream milk 
200ml cream (heavy/ whipping cream - 35% fat content) 

260g raspberry reduction **
1 tsp vanilla extract 


Pour 120ml milk into a small saucepan. Sprinkle in the gelatin powder. Stir. 
Leave to sit for 10 minutes. 

Heat together the heavy cream and milk . Use another saucepan over low heat, or microwave. 
Add in the vanilla and raspberry reduction. Stir well. 

Add the sugar and salt to the gelatin saucepan. 
Heat gently, until the sugar and gelatin have dissolved. Do not overheat! 

Pour the raspberry/ cream / milk mixture into the gelatin mixture. Stir well. 

Pour into the glasses once the chocolate layer has set. 

Place in the fridge until set completely. 


Serve each with a swirl of whipped cream, and a fresh raspberry.
If you're all out of fresh raspberries like I was , have a look at my Instagram page to see how I made these modelling chocolate ones.

Happy baking and creating!

xxM