Sunday, 24 March 2013

Pink Butterfly Cake

It's quite amazing how a cake that takes hours and hours to put together, can be demolished in a matter of minutes! Actually, not so amazing considering it was surrounded by twenty 3 year olds!

I thoroughly enjoyed making Sabrina's birthday cake, though. And thankfully I took the time to take some photo's to capture it before it was cut. What I did forget to do, though, was photograph the cut cake. But that's almost too much like taking a picture of road-kill, sometimes - so I'm not too upset about that!

The design was very much based on the incredible cakes that Vanessa Iti, Bella Cupcakes creates. I fell in love were her work the first time I saw it, and have avidly followed her since.

The cake had a diameter of 17cm and a height of about 19cm. And it weighed a lot - filled and covered in pink ganache and pink marshmallow fondant.

I used white chocolate ganache, with a ratio of 3:1 chocolate to cream, and simply added some pink powdered colour to the cooling ganache.

Here is a recipe for marshmallow fondant - that version is chocolate, but you simply omit the cocoa for plain MMF. I use both the pink and white marshmallows to get this pretty colour, with no extra food colouring added.


The sweet little butterfly girl cake topper was made out of modeling paste (fondant with tylose powder added). It is actually so easy to make a cake like this, because all the decorative details can be made days, or even weeks in advance. 


I'm glad that Jack's party is still 6 months away - but I confess, that I'm already planning his cake!

Have a great week!

xxM

Sunday, 17 March 2013

Bunny Cookie on a Stick

This weekend I've baked a caramel cake, 4 dozen chocolate cupcakes and 80 biscuits; made a batch of marshmallow fondant, some pink ganache, and 35 pink and purple cake pops.
It is entirely possible that I go a little overboard for my children's parties! Admittedly it's not all for the party - some of it is for the class later this week, but the above list doesn't come close to what is already baked and waiting to be assembled and decorated for Wednesday's party, not to mention the other goodies that can only be made a day before!

So, I'm a little busy this week! But forgetting the very-pink-party for a minute, here's a quick how to make a bunny-on-stick cookie:

(This technique is from Louise over at Cake Journal )

Cut your cookies slightly thicker than normal
Press the ice-cream stick into the cookie dough


Cover the top of the stick with a blob of cookie dough. Press together gently. 


Flip over and place on a baking tray. Refrigerate for 10 minutes, then bake as normal. 


Decorate when completely cool.


Okay, I'm going back to planet-pink ; ) 
 See you soon!

xxM 

Thursday, 14 March 2013

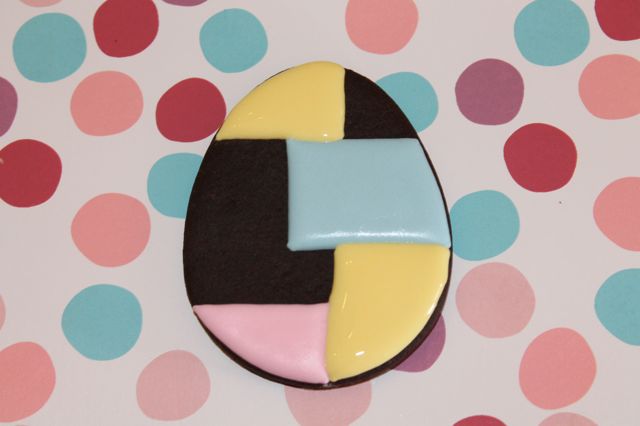
Patchwork Egg


Easter is nearly upon us! Where has the last month gone? The last cookies I did were for Valentines Day, and I didn't intend for a whole month to go past before I decorated cookies again, but um, yes....it did.
So I felt decidedly rusty doing my Easter class demo's. And I landed up having a dismal start. I wasn't in the zone at all, and made mistake after mistake. So, I let it go for a day, got some sleep and tackled them again in the morning. (Why, oh why do I even try do anything creative when it is late, and I'm tired?!)
The next day I was literally back at the drawing board. A month ago (that month that just evaporated) LilaLoa put out a challenge to sketch your cookie plan before icing. Well, it's a really great idea. But I didn't do it. After Black (cookie) Tuesday though, I had to do something constructive to get my mojo back, so...I sketched....


Don't laugh - that's about the limit of my drawing abilities!
It seems like a ridiculous design to have to sketch, but you'd be surprised at how tricky it is to do without a plan.


Flood and outline non-adjacent areas


Allow them to dry (20 minutes -2 hours depending on how humid it is)


Repeat process until all-patched-up.


Ok, so it's still a bit wonky - but you should see it compared to the unplanned version!


Have a great weekend!

xxM

Sunday, 10 March 2013

Sweet Blossoms Cupcake Toppers

Show of hands: Who eats cupcake toppers, and who leaves them on the side of their plate?
Okay, so I can't really see your hands, but I'd guess that there are a few in each camp. I'm a non-topper-eater. But I love what they look like on a cupcake, and I really love making them. And delicate little flowers are amongst my favourite. They are so simple to make and oh so pretty.


Here's an example:

Blossom cut out of tylose paste
using an embossing plunger-cutter - a really simple design


Cut out several blossoms - this technique is easier if the paste is slightly dry


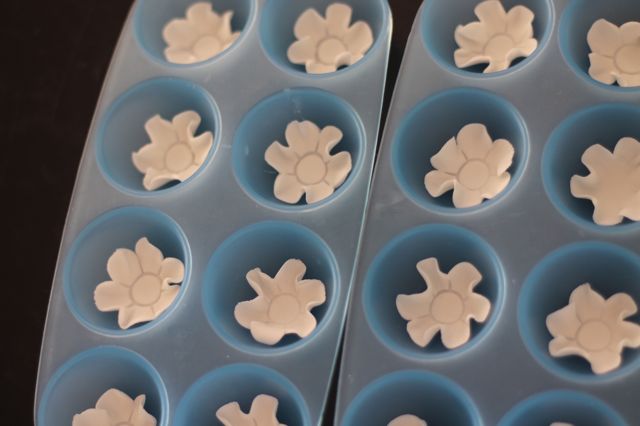
Using a toothpick, frill the petals by applying pressure to the toothpick with your index finger, and rolling it over the petal.


The petals will frill and curl.


Put the blossoms in egg trays to dry.


Cut out centres (the Jem Cutter daisy centres are great for this, but even a ball of paste, flattened against a sieve's mesh will do)


Use tylose glue to secure the centre in the flower


Ready to be used
when completely dry (a couple of hours / a day depending on how humid it is).

Pretty simple, and simply pretty : )


xxM

Wednesday, 6 March 2013

Walnut and Fig Biscotti

My Blackberry's screen is a whiteout, and now showing on my iPad is the non-best seller 5 Shades of Grey.
So, I've been a little technologically frustrated over the past few days.
Now, I don't like to share negative stuff; the reason I'm telling you this is because I wrote my notes for this recipe on a piece of paper, which I somehow managed to keep track of until my iPad responded to a reboot (hooray!) and I could type it into 'Pages' instead. And then I recklessly, foolishly scrunched up the paper and tossed it in the re-cycling bin.
But Shades of Grey has re-appeared (boo!) and all that I'd typed is hidden behind that impenetrable facade.

Anyway...I've managed to piece the recipe together. And I promise - it's good! (the recipe and the results!)


Walnut and Fig Biscotti
Adapted from Gina DePalma's recipe 

Pre-heat the oven to 170'C

1 cup chopped walnuts - gently roasted
1 cup finely chopped figs
1/2 cup light brown sugar and more for sprinkling
80g butter
2 eggs
275g flour
1tsp baking powder
1/2 tsp bicarbonate of soda
2 tsp orange zest
1 tsp vanilla extract - or just a few drops of Vanilla Girl vanilla
1tsp ground cinnamon
1/2 tsp ground cardamon
Generous pinch of salt
1 egg white - lightly beaten.


Cream together the butter and sugar.
Add the whole eggs, 1 at a time; scrape down the sides of the bowl between additions.
Mix in the zest, vanilla and spices.
Sift in the flour, salt and raising agents, then add the figs and walnuts. Mix well.
Divide dough in two.
Wrap the dough in cling-wrap, and refrigerate for an hour. (I lost track of time, and left it overnight - it was fine).

Remove from fridge and shape each ball of dough into a long sausage shape.
Place on a greased baking tray.
Brush with the lightly beaten egg white and sprinkle with brown sugar.


Bake at 170'C for 20-30minutes, until done.

Remove from oven and allow to cool.
Slice, and spread out biscotti on baking trays and return to a warm oven until dried out and crisp.

Delicious with coffee and a good book...the old-fashioned real paper kind ; )


xxM

Sunday, 3 March 2013

Sour Cream Almond Cake with White Chocolate Orange Ganache


If you've been through a few of my recipes, by now you may know that sometimes I bake things just to use up ingredients that are skulking in my fridge. There are only so many times that I can open the fridge door and see the neglected item sitting there, staring balefully out at me, before I capitulate and go into problem solving mode - and see the cake camouflaged in the sour cream.

I've looked at recipes for almond sour cream cake before, but they used boxed cake mix. I don't have anything against cake mixes, but I am a bit of a baking-snob and prefer to make things from scratch as far as possible. However, I really loved the sound of the combination, and so the sour cream in my fridge had finally found its purpose:

(From scratch) Sour Cream and Almond Cake with  White Chocolate and Orange Ganache


This is an incredibly simple cake recipe. The preparation time is a few minutes, at the most...except if you factor in the 10 days that the cream was sitting idly in my fridge, growing more dejected sour with every passing day ; )

Sour Cream and Almond Cake
recipe by Tea, Cake and Create

300ml sour cream
4 eggs
1 cup caster sugar
1 tsp vanilla extract / 8-10 drops Vanilla Girl vanilla
1tsp almond essence
2 cups self-raising flour

Pre-heat the oven to 160'C
Grease and line 2x 8 inch round baking tins

Beat together all the ingredients except the flour.
Sift in the flour and beat until just combined.
(How simple is that?!!)

Pour into the prepared baking tins.
Bake for 30 - 35 minutes, until the middle of the cake springs back when touched.
Allow to cool in the tins for 15min, then turn onto cooling racks to cool completely.


White Chocolate and Orange Ganache 

200ml cream OR sour cream
400g white chocolate discs or chocolate chopped into small, even sized pieces.

Place both ingredients into a heat proof bowl, and put the bowl over a suitable saucepan of simmering water - creating a double boiler.  The bottom of the bowl must not be in contact with the water.

Stir frequently with a silicone spatula until all the chocolate has melted.

Remove from heat.

 Add 2tsp grated orange zest (I added a few drops of Vanilla Girl orange extract to enhance the orange flava!)

Allow to cool and set. When it's a spreadable consistency - spread between the layers on cake, and on the surface, if desired, or cover cake with basic butter icing.


And here's a freebie -  Go here  for a gorgeous gerbera daisy tutorial.

Have a sweet week!

xxM

Monday, 25 February 2013

Butterscotch and Pear Cupcakes with Cream Cheese Icing

Oh my hat! Do you ever have days when you've got so much to do that you don't know where to start? And I'm one of those delayed-gratification types, you know - you have to unwrap the chocolate before you can eat it?!
No, seriously - I have to get the yucky stuff out of the way first before I can move onto what I really want to do. And what I really want to do is bake, decorate and write about it! If I don't get my "fix" I start to get pretty ratty.
Measuring, pouring, beating, folding, rolling, piping....aaah, sanity!

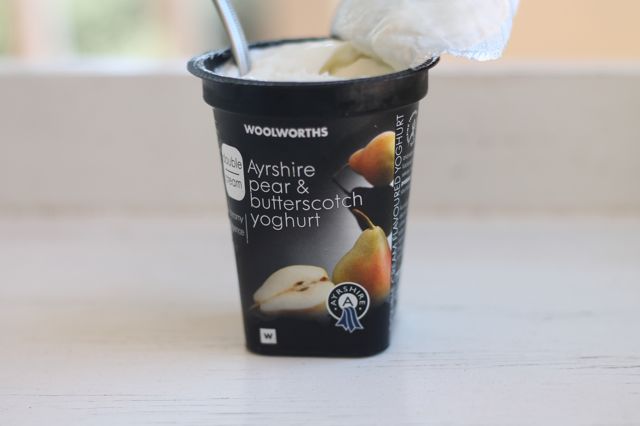
The inspiration for this ensemble came from these double cream butterscotch and pear yoghurts from Woolworths.

The recipe I used was one passed on from Nikki Palmer of Once Upon a Cupcake ( to whom I owe a huge debt of gratitude for getting me inspired to get baking and decorating).

The recipe uses yoghurt and the yoghurt tub it came in as the measuring tool for the rest of the ingredients. It actually doesn't matter what size tub you use, because as long as you use that as your measuring standard, the rest of the ingredients will be in proportion. (But using a litre of yoghurt might be pushing the boundaries! So I'll amend that to - it doesn't matter what small-sized tub you use...). These particular yoghurts are 150g / 150 ml each.

The flavour variations, as you can imagine, are dependent on whatever yoghurt flavours you can find. The Woolworths (*and they don't sponsor me to say this!!) double cream range is really great for this purpose: lemon curd, strawberries and cream, blueberry cheesecake, and this one - which I saw for the first time just before I made these cupcakes:

Butterscotch and Pear Cupcakes with Cream Cheese Icing.


..and how about some made-from-scratch butterscotch sauce to pour even more yumminess over the combo...

Butterscotch Sauce

85g butter
30ml brown sugar
40ml golden syrup
40ml cream
1tsp vanilla extract ( or 8-10 drops of Vanilla Girl vanilla)

Melt the butter, syrup and sugar together in a saucepan. Stir constantly  until all the sugar granules have melted.
Add the cream and vanilla. Mix well.
Boil for 3 minutes.
Stir occasionally.

Don't let the sauce boil for too long - this will make it stiff and sticky, and then you'll just have to dig it out with a spoon and eat it like toffee. Hmmm, maybe not such a big problem. Ok, focus...

Allow to cool before pouring onto cream cheese frosting. (If you've refrigerated it, just soften the sauce by heating in the microwave for a few seconds.)


Cream cheese icing (enough for 24 cupcakes, halve it for 12)

2 x 250g tubs cream cheese, chilled (the dense variety - like Woolworths **, or Lancewood brand)
200g butter at room temp
1 1/4 cup icing sugar, sifted
Vanilla extract

Beat together icing sugar and butter until smooth.
Add cream cheese and vanilla and beat until mixed. Pipe onto cooled cupcakes.


Butterscotch & Pear Yoghurt cupcakes (makes 24)

Use the yoghurt tub to measure the ingredients

2 tubs yoghurt (now rinse and dry 1 of these tubs to use to measure the dry ingredients)
1 tub oil
2 tubs sugar
Vanilla extract 1tsp, or 8-19 drops if using Vanilla Girl
3 eggs
3 tubs self-raising flour


Pre-heat oven to 160'C
Line muffin tins with cupcake cases

Mix together first 4 ingredients, then add eggs 1 at a time. Beat well after each addition.
Sift in flour. Fold in until just incorporated.
Spoon into prepared tins (about 1/3 - 1/2 full)
Bake at 160'C for 20 min.
Remove from tins, and allow to cool before icing.


Okay, now back to some admin and chores before I can return here...

See you soon!

xxM