Saturday, 20 July 2019

Winter Gingerbread Cottages

There's a reason why I've never done a Christmas gingerbread house class. 
Let's be realistic, this is Durban... Christmas means heat, humidity, and ants (and family and fun and festivities, yes - but mostly heat and humidity 🙈)
So, winter is the best time to construct these cottages. They're not going to fall apart as soon as you're finished putting on the final shingle.... 


 Talking about shingles, how clever is that idea to use ribbons or twine to keep the roof together?!
So clever. I can't take the credit. Thanks Pinterest!


 These cottages are a lovely size - not too large that they require a kilo of royal icing to construct, but not miniature either.
The perfect size for a little weekend getaway spot in the woods  ðŸ˜‰

My lovely friend Lauri of Treat Boutique  made up the cutters for the class for me, but I used a template to test out my design initially. I've shared the dimensions with you here. But please support Treat Boutique and order cutters from them.


You'll need to cut out two of each shape. 
The cottage is narrow from front to back, so note how the  long axis of the roof is orientated. 
The side walls are also orientated with the long axis up/down and not sideways. 
The dashed lines in the drawing are optionals - a scalloped edge for the roof, and a circle cut out of the front of the cottage. 


A sprinkling of royal icing "snow" completes the winter wonderland look.
See here to make royal icing crush -  https://www.cloughd9cookies.com/home/easy-ice-cream-cone-cookies. Use white royal icing instead, and ta-da ... it's snowing in Durban!

Happy cottage constructing!

xxM

School Cookies - Pencil Sharpeners

If you know me, you know that I like to be prepared - I don't just wing it.
There's not enough time in the week for winging. (And there's not enough serotonin in my brain to deal with chaos!)
But over-preparedness can be a problem, too.  When I bake cookies for classes,  I do it at the beginning of the week (...being well-prepared, you know!).
However, that means that I might over-cater for the classes by the time the final numbers are in.

What do I do with the extra cookies?
Unlike me, they're good at chilling...


And by that I mean that they go into the freezer, until I can find another use for them.

 Sometimes their fate is to be ground up (sorry cookies!) to be used as bases for cheesecake or tarts; but sometimes they actually get decorated.

These were left-over from the "Too Cool for School" class we did in May.  And now they're going to be super-cool at a school cake sale.


This also gives me an opportunity to share a quick tutorial on making the sharpener, that I intended as a post back in May, but didn't get around to writing up (busy as I was, baking all those unwanted extra cookies...😉)


Pencil Sharpener Cookies

If you don't have a pencil sharpener cutter, improvise by using a rectangle cutter
- cut in half if it's a large rectangle
- and trim the sides with a round or oval cutter...

To decorate 
-  Pipe half the metal inner with grey royal icing; leave to dry, then pipe the other half. Add a dot. 
  (This creates that textural distinction between the two side.) 
- Outline and flood the rest of the shape with your colour of choice. 
- Once the grey area is completely dry, brush on silver lustre dust. 
 

And while we're talking about freezing cookies -
When you thaw biscuits, if they need crisping up, simply place them in a warm oven (50'C) with the thermofan on, and they'll be good to go in a few minutes.

Happy decorating!

xxM

Wednesday, 3 July 2019

Seed Crunchies

School holidays... we eagerly await them and the respite they bring from the morning rush and packing lunch boxes.
  But can we talk about how many snacks kids need when we spend a whole day at home?! I land up taking mine out for milkshakes and hamburgers more often than I should, because I can't face having to come up with yet another wholesome meal to see them through 30 minutes until they're yelling "Mom, can I have a snack!" again...

Thankfully my daughter enjoys baking, so she helps me whip up goodies to keep some of the hunger monsters at bay.

Here's a favourite:


Seed Crunchies

Preheat the oven to 180'C
Line a square baking pan (20x20cm) with parchment paper

1 cup dark brown sugar
1 tbs golden syrup
150g butter
1 tsp baking soda

1 cup plain flour
1 cup oats
1 cup shredded coconut
1 cup mixed seeds - sunflower, sesame, pumpkin, linseed, etc

In a small saucepan, melt together the sugar and butter.
Remove from the heat and stir in the baking soda.

Mix all the dry ingredients together in a bowl. Stir in the melted butter and sugar mixture. Combine well.
Press into the baking tin.
Bake at 180'C for approx. 15 minutes, until just starting to turn a golden brown.
Cut in squares while still hot, but leave in the baking tin until cool.


Ok. One snack option done, three dozen to go....!

Happy baking

xxM

Friday, 28 June 2019

Brush Embroidery Cookie Tips

Last week we spoke about tips -  piping tips.
But the brush-embroidered cookies I used too illustrate the points (aha  - points, get it!) brought to mind another tip - the brush tip that works well for brush embroidery... (and yes - there's another word-play opportunity there with tip, but I'm fighting the urge to point that out too.
Ooops...!)


A few tips for brush embroidery 
  1. the background should be flooded and dry
  2. use outline-consistency icing for the petals  (not too stiff, not too soft)
  3. work on one petal at a time
  4. use a firm, flat tipped brush
  5. keep the brush just-damp, not wet. 
  6. clean the brush frequently
  7. try the brush side-on and flat-on for different effects


I don't consider myself a brush-emboidery expert, by any means. Have a look at Sweetambs tutorials and videos on the technique. And practice, practice, practice!

Happy decorating 😊

xxM

Wednesday, 19 June 2019

Tools of the Trade - Piping Bags and Clips

It's been interesting to see the discussion that this Instagram post created:


I posted this picture to show the new bag-ties I was trying out. 
My trusty clips, which I've used for years and years, and countless classes, have finally started  giving out at the hinge. 


These have done me well, though.
They're easy to put onto the bags, easy to take off and, as anyone that has come to a class or two will know, are colour-coordinated with the icing consistency and size of the nozzles we use.  Unfortunately, I'm battling to source similar ones of good quality.
 
I've looked around locally, but haven't found anything promising. So I decided to go to straight to the source of all things plastic - China!
Thankfully, I didn't have to make the trip in person. Are you familiar with Wish? Pretty much anything that you can imagine ordering from China is there. It is a bit of a quality-lottery, and the items take about 6 weeks to arrive  (6 months if the South African postal service goes on strike!), and then you're hit by a handling fee when they do arrive. But for the most part, I've been happy with my orders.


What was interesting for me, though, was the piping bag discussion that the post prompted.

What started it was the comment that the tip-less bags that many people are preferring now, can simply be tied in a knot at the top to seal them off.
I just haven't quite got my head around using a bag once, and then discarding it. Especially for classes, where we use between 30-40 bags!

So, I thought I'd highlight some of the pro's and con's of the two different "disposable" bag types.

Pro's of tipless bags:
  • disposable
  • cheaper set up - no need for icing tips or adaptors (see below)
  • quicker set-up 
  • tie-able - no need for clips
  • don't clog up as easily as piping tips (especially useful for very thin streams of icing; tiny nozzles clog easily)


Con's of tipless bags 
  • not always seamless - the seam creates an asymmetrical line of icing 
  • thinner plastic can pop 
  • cutting the right sized tip can be tricky (no going back if you cut off too much)! 
  • once-off use 


Using a bag with tip and adaptor:


This is the set-up that I traditionally use. Yes, it is a disposable bag, but it's a hardy plastic so is very re-usable. Royal icing is easy to clean because it's  grease-free. Soap and warm water does the trick.
You cut off the end of the bag, place the adaptor in (that's the white bit), and screw the piping nozzle in place.   


Pro's :
  • re-usable 
  • easy to refill
  • easy to squeeze out left over icing (for storage and re-use)
  • using an adaptor means you can change nozzles without having to fill another bag 
  • graded piping tips give a precise diameter of icing - no guesswork 


Con's :
  • have to be washed
  • have to be stored
  • tips clog up
  • bags needs clips 


I'm sure that there are advantages and disadvantages that I've forgotten to mention - please comment with your thoughts! But I think my conclusion is that I still prefer using nozzles/ piping tips and adaptors for classes - another advantage is that bags with tips can be kept neatly upright in glasses  (if you want to see what I mean, have a look at this very old post with very ugly pictures 🙈
I also like beginner cookie decorators to get comfortable with different consistencies of icing and become familiar with different diameter piping nozzles. Going topless tipless takes confidence!

When I'm doing a quick cookie project / icing demo's, however,  I've been choosing the convenience of tipless bags .... and  feeling very guilty about throwing them away once I'm done!

Now, back to bag clips!! I liked both the two new types I tried out. 
Back to Wish to order more... 


These are the cookies I made while trying out the new bag ties...


... using a set of brushes I also acquired on Wish!

Happy decorating

xxM 


Thursday, 13 June 2019

Black and Gold Marbled Wedding Cake

So, taking off from where we left the conversation last time (what - a month ago, no?!), I don't bake for orders. But I do frequently get requests. And - just saying - WhatsApp messages and DM's asking for quotes on cakes at 10pm are a little annoying when your day frequently starts at 4.30am.
Those I just refer onto bakers I recommend - with a side note to contact them in the morning during working hours... 😜
But anyhoo...
When it comes to family and friends, it's not that easy to say no. And often, it's something that I'd like to do for them anyway. (Instead of buying you a birthday gift for R200, let me make you a cake worth R800 😅).
Often though, I think I'll have the time to make the cake, because it's due during a hiatus in the classes, but Murphy's Law, I'll get super-busy at the hospital or it's a jam-packed week of school activities. And then it's a scramble to get it done, and I curse myself for saying yes!
But such is life!

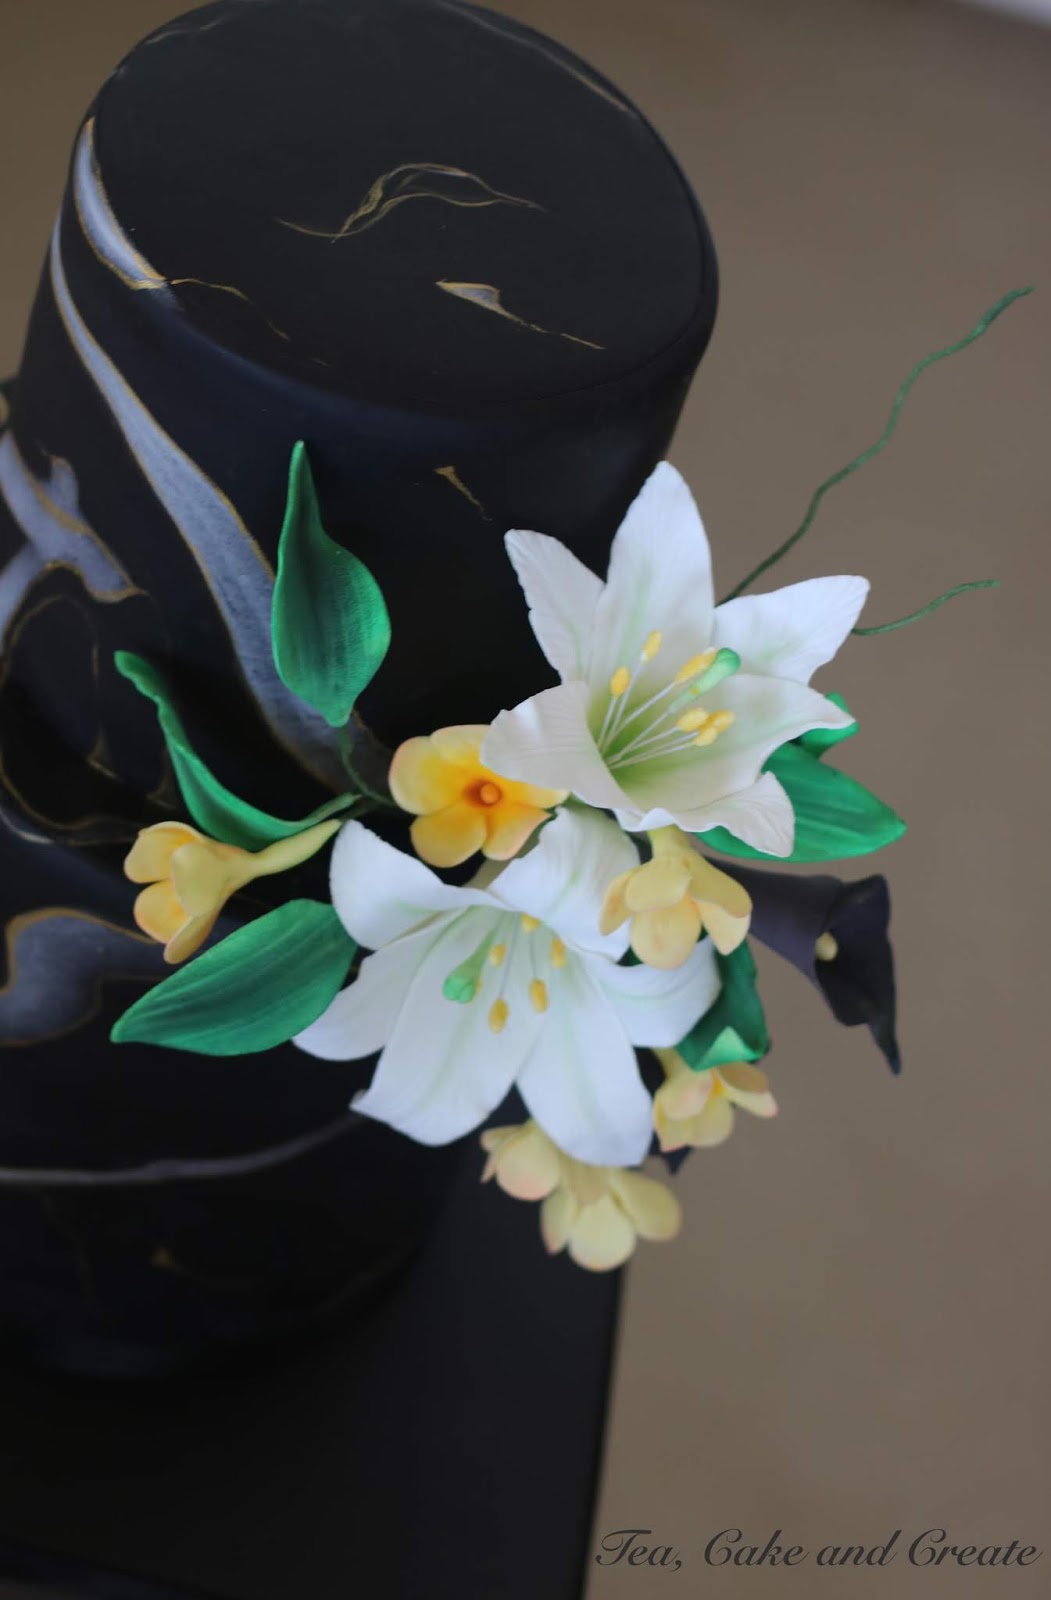
This was a cake I did for a my sister's friend's wedding.


Black fondant isn't easy to work with, and I wouldn't imagine it's the most palatable. So I incorporated a lot of dark chocolate modelling chocolate into the mix, and used the panelling technique to cover the cake.
Another option would have been to use a base of chocolate marshmallow fondant.
Why? Because if you start with a dark chocolate colour, you get away with adding less food colour to your mix.

Thin strings of white are kneaded into the paste before rolling out, to create the marbling, and the gold veining is painted on afterwards, using a mixture of gold lustre dust and alcohol.


The bride's choice of flowers were St Joseph lilies. I worked out a way to make them without having to wire individual petals. So when I have a gap, I'll make a video of that process. 
I added in some black calla lilies and yellow filler-flowers. Both super easy to make. (More future videos!)


The cake itself was layers of carrot cake, sandwiched together with cream cheese icing, all covered in white chocolate ganache underneath the fondant / modelling chocolate. 

Despite cursing myself for saying yes, I actually enjoyed making this wedding cake and the opportunity to try out new techniques.


Be assured, though - I still haven't changed my mind about taking on orders; no 10pm messages please!

Happy baking!

xxM

Thursday, 16 May 2019

Pop Art Cookies

As much as I try keep on top of everything, sometimes something has to give. Unfortunately it's often here... These pages.
While I prioritise making sure homework is done, children are fed, and wedding cakes are made (wait what?! I don't bake for orders! More on that next time...) keeping up with social media is a constant niggle in the back of my mind. And it shouldn't be, right? I mean I'm  generation-before-they-started-giving-them-cute-labels and I wouldn't be caught dead taking a selfie unless someone else was in it. Why this pressure, then? Because I am a keep-on-top-of things kind of person, and seeing as I have an IG account and a FB page, I feel I need to post pretty things, pretty regularly. So I hope you've spotted the things that I have posted there the last month, while I might not have managed to keep up on the blog.

Let's back track a little now, though ...


I can't remember when I first came across Romero Britto's art, I must have been searching for inspiration for something else. But it immediately caught my eye - how could it not?!
The bold bright, designs with their black outlines are visually so appealing.
For these cookies, though, I changed the colours to be more suitable for a Mothers Day theme. Pinks, purples, greens and blues.
Something to note is that, although the patterns are busy, if you limit the colours to a dark and light shade of each, its not visually overwhelming - light green with dark green spots; light purple with dark purple stripes. 


Here's a video of the apple being decorated. 


Adding the last details with an edible marker makes a huge difference. That really puts the pop in the pop art cookies!


Happy decorating!

xxM