Saturday, 13 April 2019

Dark Chocolate and Salted Caramel Macarons

So, I wasn't going to post this as a recipe, because you know - nothing new here; move along, folks...
But I got asked how I made these dark chocolate and salted caramel macarons a couple of times today, when I served them for tea.

It's my standard macaron recipe; and the salted caramel I often use for secret centres in cupcakes. It's handy to have a jar of it sitting in the fridge - it keeps for weeks and weeks.


Salted Caramel 

1/4 cup water
1 cup sugar
1/3 cup butter
1/2 cup fresh cream
Sea salt crystals.

Place the sugar and water in a medium sized heavy-bottomed saucepan.
Stir over medium heat until all the sugar has dissolved.
Brush the side of the saucepan with a damp brush often to remove any sugar crystals clinging there.

Bring the mixture to the boil. Leave to boil on medium-high heat until it is a rich amber colour. Don't stir - just swirl the saucepan occasionally. (Watch it carefully - once the colour starts to change it can rapidly go beyond "amber" , the sugar will burn and the caramel will be bitter).  

Once the sugar has turned amber, add the butter and stir until it has melted completely. 
(The mixture will froth up dramatically!)
Remove from the heat, wait a few seconds then add the cream. The mixture will froth up again.
Mix until smooth.
Grind in the sea salt - how much depends on personal taste. 

Allow to cool. Store in a jar in the fridge until needed. 


When you assemble the macarons, pair up like-sized shells. Pipe a ring of dark-chocolate ganache*  on one of each pair. (*100g dark chocolate and 50ml cream is more than enough for this) 


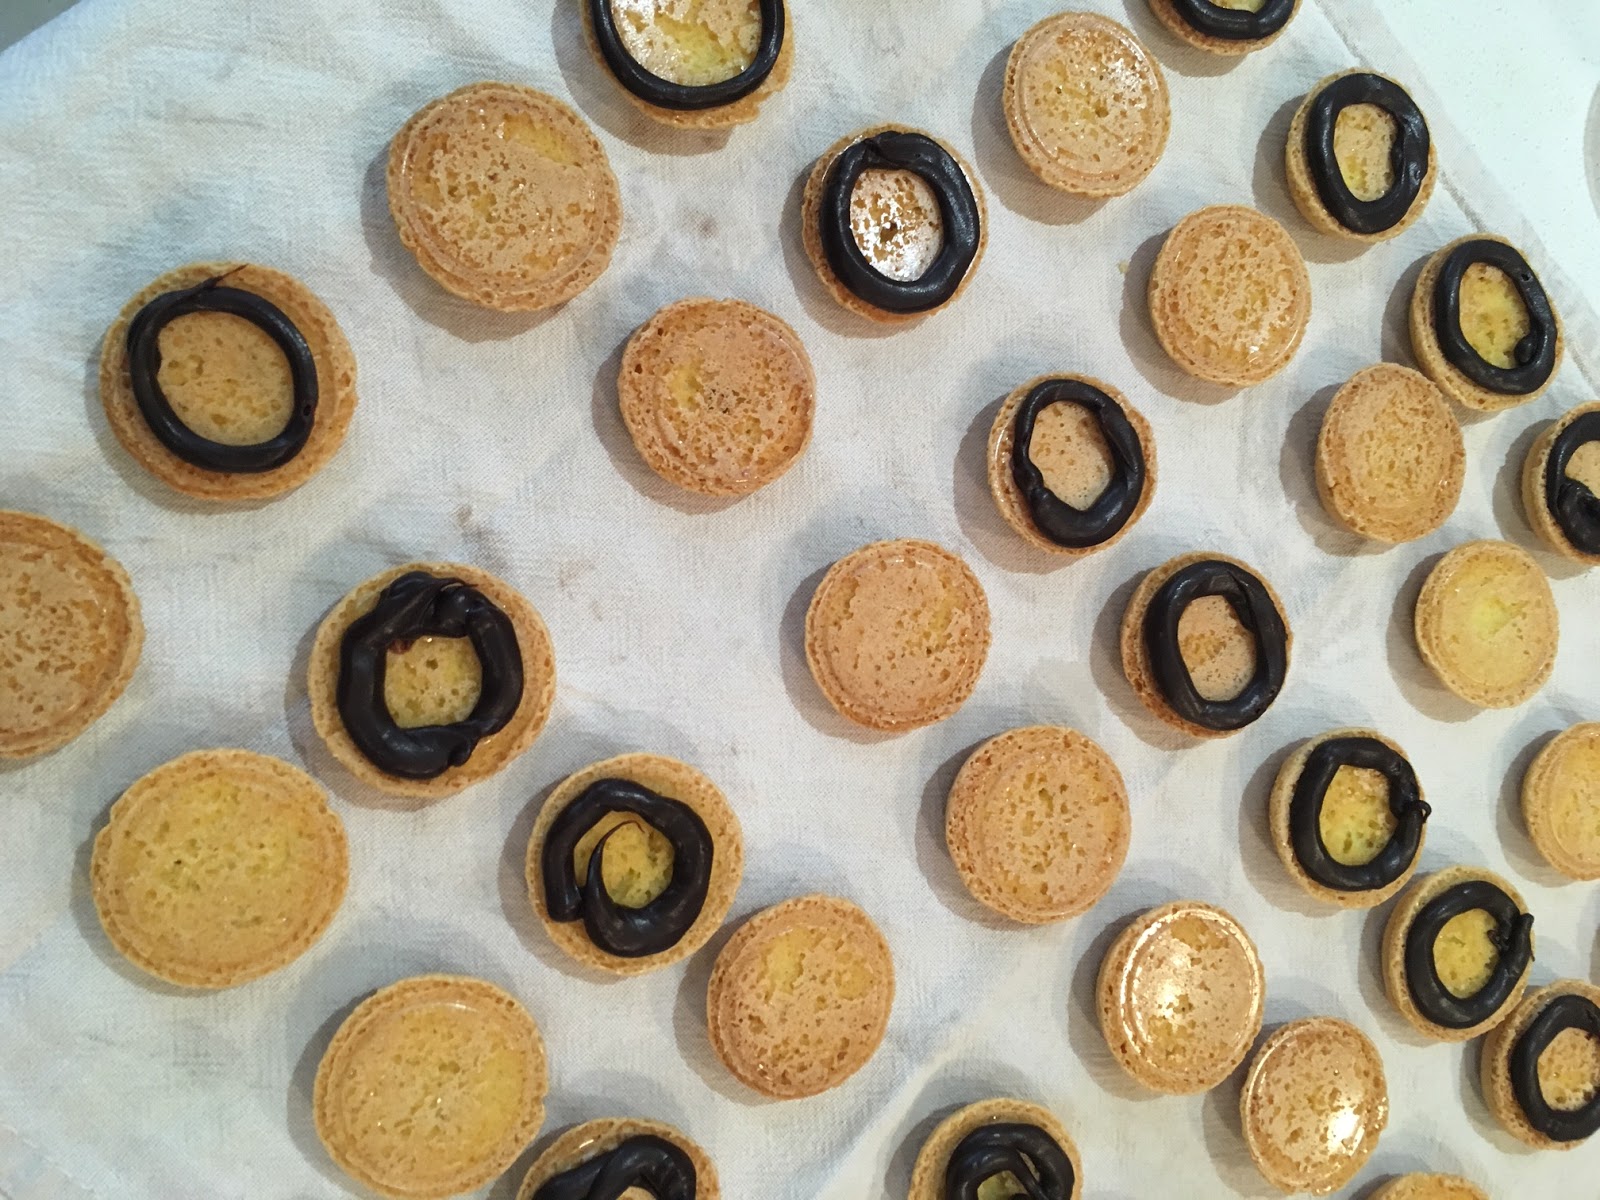
Then fill the salted caramel in the middle of the ring - if you don't make a "dam wall" with the ganache, the caramel oozes out. I learned that the hard way!


The ganache is not only a handy barrier, it is also a great flavour companion to the salted caramel. 


And if you're wondering how I achieved that gorgeous caramel colour  that the macarons have. Well, just colour them yellow to begin with and leave them in the oven a little too long. They'll bronze right up 🙈
But if you don't want to run the risk of burning your precious macaron shells, a touch of brown colouring in your batter should do the trick. 

Happy baking!

xxM 


Wednesday, 10 April 2019

Giant Oreo Cake

While I've been known to congratulate myself for spacing my children's birthdays (and ergo their parties) 6 months apart*, I didn't take into consideration my husband's birthday. That particular date has to squeeze itself into a small space between Sabrina's birthday and Easter. 
And because Easter cookie classes are always so busy,  baking anything for my husband's big day is usually a very secondary consideration. 
This year was a decade celebration, though, so we couldn't ignore it completely! 


(* You know I didn't really plan that. But I am always grateful that it worked out that way! )

We're planning an official celebration next month, but for now it was just a little family tea party at home. 


I used the not-quite-a-pound-cake chocolate cake recipe, and sandwiched the layers (which were baked in an Oreo silicone cake mould) together with cream cheese icing, chocolate cream cheese icing and real Oreo's... 


The result was a delicious dark chocolate cake with a bite of crunch and bit of cream... 


And now back to Easter baking!

xxM 


Saturday, 6 April 2019

Pineapple Cake

Ok, this is the last (very last) post on the Pineapple Party!
It's not because I don't have anything else to write about, I do. But I need to wrap up with one last cake mention...


Inside the cake, I continued with the confetti theme:
It was a delicious, moist cream cheese pound cake  (recipe here), with a cupful of funfetti (cake confetti) added to the batter. I love funfetti because it adds a dash of rainbow fun without overwhelming the cake with colorants. 


The cake layers are sandwiched together with pastel-coloured vanilla swiss meringue buttercream. The whole cake was covered in white chocolate ganache and then a modelling chocolate /fondant blend in light pink. 


You'll find the details on how to make the gold pineapple topper in my previous post. 


And that really is all there is to say about it 😋

Happy baking!

xxM 

Monday, 25 March 2019

Pineapple Cake Topper

If you're a homebody like me, coming back from holiday is always a bittersweet occasion. 
I love the familiarity of home, but it also means back to work, back to housework, and back to a list of things to do that were put away in the to-be-done-after-the-holiday file. 
Oh, boy. 
I need another holiday already!


 Some of those those tasks, though, are more pleasurable than others (the most daunting on the list is a trip to home affairs to find a long-overdue document). So, let's continue wrapping up some of the loose ends from Sabrina's pineapple-themed party. 

You might've thought I'd make an actual pineapple cake, but no - it was a pretty pink creation, with "confetti" and a gold pineapple topper - inspired by the birthday invitation. 


The topper is made from CMC / tylose paste. The underlying layer is white, with an embossed gold-lustered layer placed on top of that. 
1. cut the pineapple out of white CMC paste. 
2. use the “cling-wrap on top method” to do this - it gives the cutout more rounded edges (4).
3. place a long cocktail stick through the base of the pineapple. 
4. see... rounded edges 😉
5. roll out and emboss some light yellow CMC paste, and cut out another pineapple. 
6. luster this with gold powder. 
7. use small square or diamond shaped cutters to cut up the pineapple. Free-hand cut the leaves. 
8. re-assemble the pieces on the base pineapple. 
9. use CMC glue to stick them in place. 
10. add a few flowers to complete the topper. Leave to dry completely before using on a cake. 

In case you missed it on Instagram, here's a quick video on how to make the mini frangipanis... 


Happy decorating!

xxM

Sunday, 24 March 2019

Stencilled Pineapple Cookies

And we're back!

Our holiday felt like endless days of sun and sea.
And then suddenly it was all over!

We came straight back into piles of washing, no electricity (load shedding), and today... no water (a burst pipe.) Aargh!
Reality bites back!

So, let's rather think back to the happy days before we even left on holiday - and talk pineapple party...


I promised more pineapple cookies. And here they are, including a quick video - in case you missed it on IG or Facebook. 


I really enjoyed making these. The stencilling worked out well - much to my relief!
It was so much easier than piping a pineapple pattern, and a quick and easy way to incorporate gold into the design. (There had to be gold in the design!)


The girls loved the decorated cookies at the party - choosing them first out of all the treats. 
Pineapple power!

Happy decorating. 😊

xxM 

Tuesday, 12 March 2019

Confetti Cookies

March didn't start out well. I caught this damn virus from my damn darling kids. And all energy and motivation fled in the face of it.
But thankfully it wasn't the kind of virus that was here to stay, and I picked myself up and got cracking with party prep. Yes, March means my "little" girl is a year older and we have cakes and cookies to bake.

So Sweet! Divine 9. 

This year's theme... can you guess?

Ok, I'll tell you. It's "Party like a Pineapple".

Its choice was prompted by the fact that we leave for an island holiday the day after the party (happy dance!)

How exactly a pineapple parties, though, I'm not sure.
But, as I said on Instagram, I love this advice for a young girl:


(...that, and it helps to have a thick skin and a few don't mess with me spikes 😉)

So, all said - I'm really enjoying this theme.

Here's how to make the confetti cookies background:


Or, perhaps a video explains it better...


More pine-9-apple cookies coming soon!


Happy decorating!

xxM

Tuesday, 5 March 2019

Forest Friends Cupcakes

 You know I need my woodlands creatures fix - at least once a year. So while I was planning on teaching standard swirls and flowers for the "Basic Buttercream" cupcake class, I somehow got sidetracked by these guys. But the classes were better off for it!


It started with the fawn, top right, inspired by Christina's Cupcakes. Soon followed by fox and hedgehog. Then it dawned on me that with Easter coming, we might as well bring some bunnies to the picnic.


Bunny fluff and hedgehog spines are piped with the Ateco grass nozzle - tip 133. 
The fox is piped with a small closed star nozzle - an Ateco 28. 


Before adding the fur and spines, though, it helps to have an idea of where not to pipe. 

To demarcate the foxes muzzle, use a round cutter to indent crescents into the buttercream:


And to outline the hedgehog's facial area, use a heart cutter.  


Ears, eyes, noses, etc are made from a fondant / modelling chocolate  CMC paste blend. 


And that was that. Basic buttercream and sugar paste techniques sorted. We actually did pipe swirls and flowers, too - but the stars of the show were definitely the furry forest friends!


Happy decorating!

xxM