Monday, 25 February 2019

Dark Chocolate Cupcakes with Salted Caramel Centres and Caramel Popcorn


What could possibly be better than dark chocolate cupcakes filled with salted caramel, decked with cream cheese frosting?

I'll tell you what - throwing some home-made caramel popcorn into the equation! 
The biggest problem with making caramel popcorn? It’s not the volcanically hot caramel sauce you’ll be working with, no  - but rather the temptation to try a piece or 20 along the way. And before you know it, you’re going to have to make a second batch! 


Caramel popcorn is ridiculously more-ish.  
The idea that we have different sections of our tongues devoted to different tastes is actually incorrect, but there’s no doubt that something that is sweet and salty at the same time, tickles all the taste buds! 


You'll find the recipe for dark chocolate cupcakes and salted caramel here:http://teacakeandcreate.blogspot.com/2014/04/dark-chocolate-cupcakes-with-salted.html And for  cream cheese icing here:
http://teacakeandcreate.blogspot.com/2012/07/cream-cheese-icing-chocolate-cream.html

But right here, right now .... here's the recipe for caramel popcorn:


Caramel Popcorn 

Ingredients:

180g caster sugar 
110g butter
25g golden syrup 
2ml bicarbonate of soda / baking soda 
Vanilla extract 

+/- 70g  popped popcorn*, well salted   


(* FYI 70g of popcorn kernels will give you 70g of popped popcorn. Caramel popcorn is pretty magic stuff, but we don't create or destroy matter when making it!)

Heat sugar, butter and syrup together in a saucepan on medium-high, stirring until sugar has melted. Then simmer for approximately 4-5min and just starting to turn amber (or when a sugar thermometer reaches 124'C ) Remove from heat and stir in the vanilla and bicarb. 
While the syrup is simmering, spread the popped popcorn out on 2 large baking trays lined with non-stick paper. 
Pour  the syrup over the popcorn, mix well, coating as much of the popcorn as possible. Do not be tempted to do this with your hands  🙀- the syrup is extremely hot; rather use two forks. 
Place in the oven for 8-10minutes at 180'C.  Allow to cool before you start tucking in!


Store any caramel popcorn you don't use on cupcakes in an airtight container. It'll keep for a few days. 
Until it's gone ... all gone 😿


Enjoy!
xxM 

Saturday, 9 February 2019

Choc-Chip and Orange Yoghurt Cupcakes

Oh, 2019 you're sending me mixed messages, I don't know where I stand with you. 
Can we just be friends?!

I'm feeling a bit nostalgic for 2018 . Can you tell? 
Oh, the good old days. 
Life was simpler back then... 😝

Don't worry, though. I'll get the hang of this year, around March. Maybe May. 
Until then? Don't over-think it.  Chocolate helps too. 

Cue choc-chip cupcakes....


I re-visit this recipe every couple of years - it's got so many possibilities, and it never disappoints. 
(Now that's comforting!)

You use yoghurt in the recipe, and then use the yoghurt tub to measure the ingredients. 
A "tub" being a little yoghurt cup, but not the little little * yoghurt cup - 150g, or 175g will do.  

(*Definition of little little: the ones that you'd finish off in 2 spoonfuls as an adult, but seem to contain litres of yoghurt when they get spilled on your child's clothes or in a school lunch box ....)


I've used full cream choc-chip yoghurt to make these, plus extra chocolate, and some orange zest. It's a flavour pairing I use often - comfort food, I tell you - but I know that not everyone loves citrus with their chocolate, so omit it if you must. (But really, though - only if you must!).


Choc-Chip and Orange Yoghurt  Cupcakes

Preheat the oven to 180'C 
Line 2x 12 hole muffin trays with cupcake cases. 
If they are the larger sized muffin trays, you may only get 18 cupcakes out of this recipe. 

Ingredients
2 tubs* choc-chip yoghurt (now rinse and dry 1 of these tubs to use to measure the dry ingredients) 
1 tub oil
2 tubs caster sugar
3 eggs
1 tsp vanilla extract 
zest of 1 medium orange 

3 tubs cake flour 
1 1/2 tsp baking powder 
1 tub finely chopped dark chocolate pieces

Whisk together the wet ingredients. Add the orange zest. 
Sift in the cake flour and baking powder. Mix until smooth. 
Fold in the chocolate. 

Divide  the batter amongst the prepared cupcake cases. 
Bake at 180 ' C for approx. 20 minutes, or until they're just beginning to turn golden and spring back when touched.  


I topped some of these with a simple glaze made from icing sugar and orange juice, and a squiggle of melted chocolate. But really, they're good just as they are. 

Enjoy!

xxM

Tuesday, 29 January 2019

Blueberry Crumble Cheesecake Bars

First recipe share of 2019, and it's a keeper!

I love crumble. I love cheesecake. And I love the two together!  (And by I,  I mean we, right?! )

While there are a few steps here for the various layers,  you could quite easily make the base and crumble in advance, then put it all together when you're ready to make the cheesecake layer. 


A few years ago I would have proudly made the blueberry preserve from scratch, too. 
But these days, between work, kids' sports, homework, buying groceries, making meals, etc, etc *
I cut myself some slack. 
It is okay to delegate! And I've delegated the preserve-making to Bonne Maman - delicious preserves conveniently found in a jar at the local supermarket 😉

(*etc encompassing everything else we mothers do - too exhausting to list!) 


Blueberry Crumble Cheesecake Bars
recipe by Tea, Cake and Create 

Line a 22cm square cake pan with a double layer of baking parchment.
Pre-heat the oven to 160'C when starting the cheesecake preparation.


Base
200g cookie crumbs (use a food processor, or smash the cookies with a rolling pin in a ziploc bag)
40g uncooked porridge oats (not instant oats)
80g butter

Melt the butter. Stir in the cookie crumbs and oats. Press into the base of the square cake tin.
Chill in the freezer for 30min.

Crumble 

40g uncooked porridge oats (not instant oats)
60g cake flour
40g brown sugar
50g butter,  at room temp.

Use a fork, or your fingers, to mix all the crumble ingredients together. Set aside until needed.

Cheesecake Layer
2x 230g tubs medium-fat cream cheese
100g (1/2 cup) caster sugar
120ml (1/2 cup) sour cream
2 large eggs
1 tsp vanilla extract

Beat the cream cheese and caster sugar together. Add the sour cream. Mix well.
Beat in the eggs and vanilla extract.
Pour the mixture over the chilled base.
Bake at 160'C for 30 minutes.

Blueberry layer 
3/4 cup good quality blueberry preserve
Heat the preserve in a small saucepan to ease the following step:

Spread the layer of blueberry preserve on the cheesecake after it has baked for 30minutes.
Generously sprinkle the crumble on top of the blueberry layer.

Return to the oven and bake for another 30minutes.
The crumble should be light golden brown.

Remove from the oven to cool.
Refrigerate for 2-3 hours before removing from the cake pan and slicing into squares.


Try the jam layer with different preserves - strawberry, raspberry, peach... Whatever you find on the shelf 😉

Happy baking!

xxM

Monday, 7 January 2019

Star-in-Star Cookies

I would love to be posting something fresh and amazing as the first post of 2019; but I'm afraid I'm still quagmired in 2018!
Although the Christmas tree is down and the decorations are all packed away -  I can say that, at least! But I'm otherwise feeling quite unprepared to tackle this year.
January is always a challenging month - it's a transition from the order of a year well in hand, to the chaos of holidays, then back to the demands of a new school year. Back to the crazy juggling act that is life, parenthood, and work (career, business, hobbies...)
We do juggle a lot, don't we?
So I'm going to cut myself some slack and not feel too guilty about posting something that was meant for Christmas, but will be my first New Year offering instead. Ok?!


These star-in-star cookies are so simple, but lovely additions to a Christmas any-occasion cookie jar. Think heart-in-hearts for Valentines Day!

You'll need :
- Half a batch of the lightly spiced cookie dough* chilled**
- Half a batch of chocolate cookie dough* chilled**
- A set of star cutters in graduated sizes.
- The usual paraphernalia for making cookies: rolling pins, silicone mats, baking trays, etc

(*Either halve all the ingredients in the recipes, or make full batches and freeze any cookie dough you don't use - it's always handy to have some cookie dough in the freezer!)
(**it's much easier to do cut-outs with firm chilled dough. If you find that the dough becomes too soft, refrigerate it again  before continuing.)

Method:
- Pre-heat the oven to 180'C
- Roll out chilled ** cookie dough
- Cut out large/medium stars; use a smaller star cutter to cut out stars from their centres. Don't discard these small stars.
- Repeat with the other batch of cookie dough.
- Fit the alternate small stars into the centre of the large stars.


Place cookies onto cookie trays.
Gently press a little caster sugar into their surfaces before baking if you want a slightly sparkly appearance. Refrigerate for 15 minutes.
Bake for 10-12 minutes in the pre-heated oven.


May the stars watch over on you in 2019!

xxM

Saturday, 15 December 2018

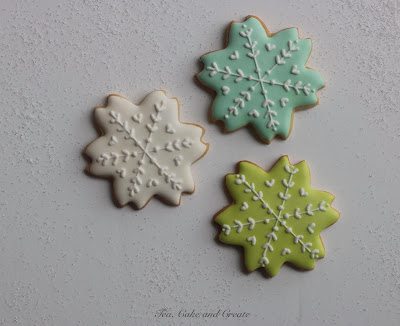
Snowflake Cookies and Cutters

Every Christmas I pause, and think how odd it is to be decorating snowmen and snowflakes in the peak of summer. But it doesn't stop me from doing it! The pull of Northern Hemisphere tradition is too strong to be denied (and who knows, with climate change maybe one day we'll get our Christmas wish... Eeek! A classic example of be careful what you wish for!)

Brrr!


So, I do own a snowflake cutter or 3... but in case you don't, here's a very easy solution:

Use a 6-petal flower cutter (got one of those?!) and cut indents into each petal of cookie dough.
That's the tip of a little heart cutter I'm using for the task &/in these pics...


Bake and decorate - Voila - a snowflake, or 3...


Have a look at another post from a year ago on how to make wet-on-wet / colour-flow snowflakes.
http://teacakeandcreate.blogspot.com/2017/12/wet-on-wet-snowflake-cookies.html


Happy decorating!

xxM

Friday, 7 December 2018

Christmas Pudding Decorated Chocolates

We're all saying it, so it must be true - every year is going by faster. Right?!
Blink and Christmas is here again. One of these days we won't even need to take down the decorations! (What a thankless task anyway 🙈 )
So, in the interest of saving time, sometimes you have to cut a few corners:
While it would be really special to make teeny tiny mini Xmas puddings for this project, there was just no way that was going to happen this week.


Enter an easy solution, though: chocolate balls. From the store!!
They're perfect for the task.
These are mousse filled, dark-chocolate candies. (Oh, yes!)


Pop them onto a paint palette for stability. (One that you use for your edible art, not the kids' poster-paint-spattered one!) 
Use a little royal icing to decorate -
Layer on your white icing. Once that's set, pipe on the green, and pop on a red sugar pearl. So easy. And you can tell from the pictures, I didn't even use icing bags and piping tips; just sturdy bags with the corners snipped off. 


Very organic-looking 😉


They're delicious little mouthfuls on their own,  but I used them as toppers - nestled on a bed of ganache on top of dark chocolate cupcakes.  


'Cos it's the season of giving! 😋

Happy baking and creating!

xxM

Monday, 19 November 2018

Cinnamon and Brown Sugar Buttercream

Yip, it's definitely that time of year: a spoonful of chaos added to a cupful of busy-ness!
I have to be very disciplined with my days, to get everything done. But there's many a curveball along the way: emergency cases at the hospital, load shedding, burst pipes ... and that was just the past three days!
So Monday comes as a relief: the electricity is on; water's flowing from the taps, and the kids are at school, so I  can get some Christmas cookies baked.
  And post a recipe - it's been a while, I know!
Actually, it's only half a recipe, just the icing on top: cinnamon & brown sugar buttercream.
(I'm on a tight schedule here, ok!? 😅)


The cupcakes are nothing new, just some of these tried-and-tested vanilla cupcakes, filled with a little jam.
I was going for a jam /cinnamon donut kind of flavour experience, and a hot-milk sponge with a centre of smooth apricot jam was a good base to work from.
That, and I already had some baked and in the deep freeze begging to be used 🙈


Cinnamon & Brown Sugar  Buttercream 


125g butter
100g brown sugar 
150g icing sugar, sifted
2tbs creme fraiche (sour cream), alternatively use cream cheese 
1/2 - 1tsp cinnamon (depending on how cinnamony you want it) 
1tsp vanilla extract 

Beat the butter and brown sugar together until light and creamy. 
Add the sifted icing sugar, cinnamon and vanilla. Beat well.  
Beat in the sour cream or cream cheese. This is just to cut the sweetness of the icing, so it's optional... but recommended!

Makes enough icing for 12-15 cupcakes, depending on how elaborate your swirls are. Double the recipe if necessary. 


For the cupcakes - follow the recipe link above.
 Once the cupcakes are baked and cooled, either use an apple corer to core out a centre to spoon in the jam, or 
use a large round tip (french tip, pastry tip) to pipe the jam into the centre of the cupcake. Top cooled cupcakes with brown sugar buttercream. 
Add a mini lightly-spiced cookie for decoration. 

Happy baking!

xxM