Thursday, 30 May 2013

Hot Air Ballon Teddy Cake and Buttercream Techniques

I seem to have so much more brain-space now that the builders have left. No - the kitchen is not yet finished, that's in the hands of the cabinet-maker now (but I'm not supposed to be talking about that, remember?!).
 The house is quiet, and relatively neat - at least until 12pm when the kids finish school - and my creative juices are flowing again. *Aaah, relief!*
So, I made this cake just because I wanted to!


Thankfully, I have a bunch of  cookie and cupcake-pals that come around every week for classes, so I can foist my cakes onto them for tea! Thanks, gals (and the occasional guy!)


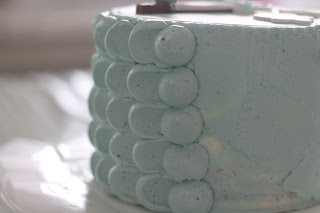
If you haven't yet seen a how-to for this buttercream technique, here's a quick explanation;

Crumb coat a cake - ignore the two-tone icing in mine, it should be the colour of the icing you are using for piping.


Pipe dots of icing onto the cake with a large plain round icing tip - I used an Ateco 806

Use a palette knife, or spoon to smoosh the dot


Continue all the way around the cake. Finish with a column of dots in the last gap.

This was a two-layer  6-inch (15cm) cake. 
It took a large batch of swiss meringue buttercream  (double all the quantities in that recipe**) to fill, crumb-coat and complete the technique. 

**you'll need 10 egg whites, which is exactly the amount in a bottle of Woolworths fresh egg whites - which I don't get paid to say! ; ) 


Happy creating!

xxM 

Tuesday, 28 May 2013

Chocolate-Chip Cookies

Has winter arrived?? You can never be too sure in Durban. Life's tough on the East coast : )

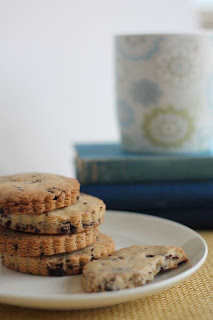
 Anyway, I was planning on posting a recipe for spicy (as promised!) orange cupcakes with white chocolate swiss meringue buttercream, but the weather today put me in the mood for snuggling under a blanket with a book and hot chocolate - which, btw, I didn't have a chance to do! - and a tall stack of choc-chip cookies.


The cookie dough in my fridge is usually all dedicated to the hundred or so biscuits that I have to bake for each class, but I had a little left over, and sweet-toothed Jack had been introduced to store-bought *shudder!* choc-chip cookies at my sister's house, and was demanding them again. So it was easy enough to whip up a batch:
Simply add some chopped-up chocolate to my basic butter biscuit recipe, and there you go....


Choc-Chip Cookies 
recipe by Tea, Cake and Create


250g butter, at room temp. 
300g caster sugar 
2 XL eggs 
620g flour
1/2 tsp salt
1 tsp vanilla extract - ( for Vanilla Girl vanilla,  just 8-10  drops.)
200g dark chocolate* roughly chopped. Use a serrated knife to chop the chocolate. 
1-2 TBS milk,  if needed

Cream together the butter and sugar
Add the eggs, one at a time, beating on low speed. Add the vanilla. 
Sift in the flour and salt. 
 Mix briefly, then add the chocolate chips. Mix until dough is  just clumping, (if it seems too crumbly, add a dash of milk) then form into a ball by hand. Place in cling-wrap, and refrigerate for 4 hours or overnight. 

Roll-out and cut out cookies on a surface dusted with cornflour. (See here for some tips).

Bake at 180'C for 8-10 minutes until the edges are just starting to turn golden. 


*Try other variations - nuts, raisins, cranberries, white chocolate, cranberries and white chocolate...Yum! 

Enjoy!

xxM 


Sunday, 26 May 2013

Chai White Chocolate Ganache

It was amazingly difficult to photograph these macarons.
They just kept on wanting to roll off the plate, and straight into my mouth. Biz-arre!
; )

Anyway, I'm still using the same macaron recipe as before, but what I discovered is that making them is not like riding a bicycle! I took a break after I'd felt I got the hang of it last September. I didn't mean for  6 months to go by before I made macarons again; but I guess it did.
It was almost like starting from scratch. But it only took three failed batches this time, compared to (at least) 6 last year! One thing I did learn was that the bottled egg whites you can now buy from Woolworths don't seem to work as well as aged fresh egg whites (does that make sense?! "aged fresh"! Making mac's clearly scrambles the brain!)

What I really wanted to share with you, though, is the Chai Ganache that I made to fill the macarons: Delish!

Chai White Chocolate Ganache
recipe by Tea, Cake and Create

200g white chocolate discs, or blocks cut into small, even sized pieces
100ml cream
1 1/2 tsp cinnamon
1/2 tsp ground cardamon
1/2 tsp ground ginger
1/2 tsp ground cloves
1/4 tsp ground nutmeg

Place both the cream and chocolate into a bowl, and melt the chocolate either in the microwave on low power - 2 minutes increments, stirring in between; or by using a double boiler.
Stir occasionally, until all the chocolate has melted.
Stir in the spices, and leave ganache to set.

When it is a spreading consistency, spoon between the macaron shells.


It would also make a great topping or secret centre
for cupcakes, or sandwiched between layers of cake.

Be warned - I'm on a winter spice and citrus kick;  more recipes to follow!


xxM


Saturday, 18 May 2013

Autumn Cupcakes

A project never really comes together for me until I've settled on the colours.  That was just the case for the Autumn themed cupcakes I was working on this week.
 I was sitting at my work table trying to come up with ideas, cursing myself for scheduling a theme for which I didn't have any pre-existing inspiration!
The Autumn colours were obvious - rusty reds, orange/yellow, brown. But how to pull it all together? Well, it's clear now  - but I was having a reptilian day: my brain was taking a while to warm up!

Which is your favourite season? For me, without a doubt it is Autumn - there is something about the quality of the sunlight, the thinning trees, and the stillness that comes at this time of year that I just love.
And the clear blue skies.
Duh! Teal blue - there it was: the perfect complementary colour!


So, here are the colour blends that I used (all with Cake Flora gel colours added to plastic icing / fondant for covering the cupcakes, and tylose paste for the decorations)

Red-Red + Chocolate Brown
Red-Red + Electric Orange
Egg Yellow + a drop of Red-Red
Avocado Green + a drop of Super Black
... and ... Teal!

(The brown is chocolate marshmallow fondant)

When you add colour to fondant, do so slowly - too much and you'll be dealing with a sticky mess, and your hands will be more coloured then the icing!
And bear in mind that left overnight, many colours mature and might even become a shade darker.


And finally, one that is just coloured with cocoa (the tastiest colourant, by far!) -
a hedgehog cupcake made with chocolate buttercream using a grass nozzle (Ateco 133) and some chocolate MMF.


Happy Autumn!

xxM

Friday, 17 May 2013

Hello Kitty Cookie-Pops

I'll freely admit that there are a good few (dozen) things that I'm not good at - symmetry being one, and taking pictures while I'm doing something is another. There are plenty more, but let's save them for another time...
I mention those two, because they're relevant to my post today:

Hello Kitty Cookie-Pops!


I made these for some fellow bakers in PMB - Leigh and Gen from Simply D'Licious. What talented ladies! So I was especially nervous about doing these cookies - because these gals produce such great things, themselves. I had a night full of royal icing dreams before I was going to start! And I was especially worried because I knew I was heading into crater territory: Royal icing in small spaces craters. It does. And it is hard to stop. Read this post from Marion of "Sweetopia" if it is something that bothers you, too ; )


See the craters in the paws and bow?


Here are a few (blurred!) pic's of the process:


Using "15-20 second consistency" royal icing*, I outlined the bow first, then the rest of the face and body with black royal icing.
*(see here for a bit about consistency), or another post on  cookie decorating basics.


After that had dried, I flooded the face, the hands and ears - crater territory!!
Left that to dry for 15 minutes.


Then the bow and top - with some wet-on-wet detail on the top. And left that to dry.


Then added the eyes and nose.

I thought I was done, but then remembered: the whiskers!


Bye-bye Kitty!

xxM

Tuesday, 14 May 2013

Chocolate-Date Cake

I watched with a twinge of nervousness as this cake rapidly disappeared on Saturday!
It is always gratifying to have something you've made go down so well - but only after you've had a chance to take some pretty photos ; )

I rescued a few pieces, just so that I could share it with you, of course. Photos included!


I made this - really just an amped up version of a date fridge cake - for my wedding cake. (Oh, my word: just remembered it's our anniversary tomorrow!! Please tell me that the 9th anniversary gift is cake? No? Oh, dear....)

Anyway... I made this type of cake for our wedding. Ringed it with chocolate filled wafer sticks and topped it off with a mound of truffles from Arriba Chocolates in Durban.
It was awesome - even if I say so myself! (This was back in the days when I hadn't even heard of ganache or fondant).
But it didn't get eaten! Everyone was so over-fed by our amazing caterers by that stage of the evening (we'd had spicy tomato soup, Mexican fajitas, then pancakes with every decadent filling you can imagine -thanks Di!) that there was no space for cake.
So we froze it.
And then removed it piece by piece from the freezer over the next few months.


Okay. Here's the recipe:

Chocolate-Date Fridge Cake
Recipe by Tea, Cake & Create


450g dark chocolate, chopped into even sized pieces
100g butter
250g pitted dates, chopped
1 egg, lightly beaten
1 packet (200g) Marie biscuits, broken into small and medium sized pieces
100g glacé cherries, chopped
100g salted roasted peanuts
100g white chocolate, chopped


In a heavy bottomed saucepan, on low heat, melt together the chocolate, butter and dates.
When the chocolate is all melted, mix in the beaten egg.
Stir well, incorporating the egg completely into the other ingredients.
Remove from the stove. Allow to cool slightly.

Add in the biscuit pieces, the cherries and the peanuts. Mix together. Add the white chocolate last - you don't want it to melt.

Spoon the mixture into a greased 22cm springform pan. Smooth out the surface with a potato masher.


Refrigerate until set.
Dust with icing sugar before serving.
Remove from the fridge 30min before serving - otherwise you'll need a chainsaw to cut through it!

 : )

xxM


Wednesday, 8 May 2013

Owl Cake

Oh, my! My computer's alive!
Somehow my children (3 and 4) have managed to switch the "Voice Over" function on on the Mac, and I have no idea how to switch it off.
So, as I sit here typing this, every letter is being spelt out to me, every mis-spelling mentioned, and every window that opens described - by a staccato voice that only another computer would find pleasant.
I've tried going into the application to find the off switch, but I feel like I have to be sneaky about it - do it behind the computer's back! And now it's reading aloud what I've just written... *gulp!*

That's a healthy dose of paranoia for the morning. Nothing that can't be solved with some cake, though : )

I made this in a hurry for my niece's birthday. I just had a morning to do it. (Thankfully she'd requested an owl cake - not an elaborate princess castle!)


The Owls are made out of chocolate marshmallow fondant and modeling paste - fondant with tylose powder kneaded in. The "official" amount of tylose powder is 5mls per 250g fondant. But I usually do it by feel - adding a little at first, then more if needed.

The cake was 4 layers of vanilla cake - using Nigella's Buttermilk Birthday Cake recipe, with Nutella and white chocolate ganache between layers.

 The whole cake was covered in white chocolate ganache, then textured buttercream.

Here's Nigella's delicious Buttermilk Birthday Cake recipe:

(** it makes a really tasty but smallish cake - and I wanted a t-a-l-l one. So, I made two batches to get 4 x 6 inch (15cm) layers. Next time I'll just try double the ingredients  - sometimes doubling works, sometimes it doesn't. If you try it, let me know how it turns out!)

Buttermilk Birthday Cake
recipe by Nigella Lawson - How To Be a Domestic Goddess

 1 2/3 cups flour
 1/2 cup butter, at room temp. 
 3/4 cup sugar
 3 eggs
 3/4 cup + 2 TBS buttermilk 
 1 1/2 tsp baking Powder
 1/2 bicarb
 1/4 tsp salt
 1 1/2 tsp Vanilla extract (or 8 - 10 drops of Vanilla Girl vanilla) 

Pre-heat the oven to 180'C 

Sift together the flour, baking powder, bicarb and salt. 
In a measuring jug, measure out the buttermilk and stir in the vanilla extract.

Using an electric mixer at medium speed, cream together the sugar and butter until light and fluffy.
Reduce the speed to low, and add the eggs, one at a time; mix for 30sec between additions.

In alternating increments,  add the flour and buttermilk to the mixer, beat between additions.
Begin and end with the dry ingredients.

Pour into the prepared baking tin, and bake for approx 40 minutes. (I separated the batter into 2  x 6inch tins, and baked that for 30 min. )

Cool in tin for 10min, then turn out onto a wire rack to cool completely before decorating.

Owl-fully good!


xxM


(PS...and now, a day later - a simple "cmd F5" has gotten rid of the "man in the machine". Suddenly it's very quiet in here...)
; )