Pages

Thursday, 24 December 2015

Santa Cupcake Toppers

I think I've finally been hit by the festive spirit! Christmas cheer is here!  Ho Ho Ho!
It's been particularly tardy in arriving this year. Maybe because I had to do my shopping so late. (My usual plan is to get it all done before the school holidays start, which just wasn't possible in these busy last few months.) And when you go to the mall this close to Christmas, forget being hit by festive spirit, you get assaulted by it... (There's not a lot of peace and goodwill in the parking lots as people fight for that last empty space!)
But here we are, with just a few hours to go - and I feel like I can finally relax into the occasion.

So here's my gift to you: an easy Santa cupcake topper tutorial....


Santa Cupcake Toppers:


What you'll need:   
  • Sugarpaste in red, white, flesh and black (this is a fondant/ modelling chocolate blend) 
  • Round and scalloped cutters
  • Small roller
  • Edible glue and brush
  • Dresden tool, bone tool
  • Small palette knife
  • Edible powder colour pink and brush
  • Cornflour for dusting your work surface
Cut out a circle of flesh-coloured paste using the plain round cutter (use the smaller of the two). This is the face. 


Cut out a circle of white paste using the larger scalloped cutter . 
Cut away a segment of white paste using the smaller plain cutter. 
This is the beard. 


 Use two small balls of white paste to create the moustache 


Roll them into tear drop shapes


Make a nose, eyes and eyebrows 

Cut out a circle of red paste for the hat


Cut off the excess


Add a strip of white paste


Add the tassel of the hat


and a pom pom...

Use the edible glue to put all the pieces together


Make an impression for the eyes, add creases


Assemble the rest of the face and add some pink "blush" to Santa's nose. 


Ho Ho Ho!


Merry Christmas!

xxM

Thursday, 17 December 2015

Purple and White Wedding Cake

Did I mention that in the midst of Christmas classes (620 cookies, 200 cupcakes); work (lots and lots of work); school functions, and end-of-year events, I also had a wedding cake to make?
No big deal really - just a three tier cake and cakes for the mother-of-the-bride and mother-of-the-groom (as is done for Zulu weddings) that I had one afternoon to rustle up!
 Princess, who works for me, had asked me to make her wedding cake - and I couldn't very well refuse! She's such a sweetheart, and does so much for us - always with a big smile.
 But I literally dashed home from the hospital on the only day that I had a gap to make it and worked for 9 hours to get it done. Haibo! 


Thankfully it was all vanilla sponge. Her colours were purple and white.
The bottom tier was covered in buttercream rosettes, and the top two with fondant and edible lace.

If you've battled with lace before, try this homemade recipe... https://www.youtube.com/watch?v=WVLgSfe92jY  It's not as liquid as the pre-mixes, but works really well in all weather conditions - which is important right now in this misty cloud we're living in!


The great thing about edible lace is that you can make it in advance, and store until needed. I hadn't made it in advance (of course not - why make life easier for myself?!)  
But if you use the recipe above, you can have lace ready in a matter of minutes.

All in a day's work  ;o)

Happy decorating!

xxM

Sunday, 13 December 2015

Christmas Cupcakes 2015

These were the Christmas cupcakes that nearly weren't. 
Very nearly weren't. 
I've been burning the candle at both ends recently (who hasn't?!), but had things under control. I was wrapping up the cookie classes; my Christmas demo cupcakes were already done, all I had to do was bake for the cupcake classes and prepare the pastes and icing. In between work and, you know - life. 


And then ... disaster! I'd been storing the cupcakes in the oven, away from humidity and harm. Which is a good idea, a long as the oven doesn't  accidentally get turned on. Aargh! 
Well, I didn't really like those cupcakes anyway (*Sob*)!  

So, I had to find another few hours to make new demo's. Who needs sleep, anyway?
And did I mention that Durban's weather has been 38'C with 80% humidity lately?! 
If you've never had to make sugar creations in those kind of conditions... Count. Yourself.  Lucky!


So, these were all round two. Photo's taken before the Friday class. They didn't look that way by Saturday. The gingerbread man especially couldn't handle the heat. He fell to pieces.
That's the story of the gingerbread man. Southern hemisphere style.


Anyway, we did it: Christmas cupcakes classes all wrapped up.
Thank you, Saturday ladies for shifting to a later time slot !! (I had to squeeze in two theatre cases before the class... burning that candle, and all...!)


Poinsettia tutorial here:
https://uk.pinterest.com/pin/345792077614289975/


Gingerbread man tutorial here:
http://crumbavenue.com/tutorials/gingerbread-man


Happy decorating!

xxM

Saturday, 5 December 2015

Christmas Cookies 2015

620 odd cookies and about 6kg of royal icing later, and we've wrapped up Christmas cookie classes for 2015. Phew!
And then I did some extra ones for my children to take to school for break-up day this week.
I'm officially all Christmas-cookied-out!


At least I'm not nauseated by the colours, yet  - although I did get some grumbling about the lack of red.... ahem, Tara and Tarryn! ;o) 
But after 4 years of Christmas cookie classes, I have to keep it fresh for my own selfish sake! 

This was my 1st take on the colours for this year's demo cookies...


But it just wasn't working for me. Too much like last year's colours (and we don't do last season here - bwah!) 
And decorating winter shapes in the height of southern hemisphere summer was also sitting uncomfortably with me. It was easily solved by making them pink and lime green, though! 


And, FYI - that candy pink actually is red! "Red Red" gel, to be exact. So there! 

Happy decorating! 

xxM 


Sunday, 29 November 2015

Movember Cake Pops: Melting Chocolate

Oh, chocolate, chocolate, chocolate...
You've probably read that with the wrong tone. It was an oh, not an ah.
Now picture me shaking my head wearily and saying it.
Yes, that's right - that kind of tone.
(Sometimes dealing with chocolate is like dealing with your children at the end of a looong day.)
And if you've battled with cake pops, it's either that your mixture is wrong, or the chocolate is being bratty.
(Find how I make my cake pops mixture here.)

So, here's a chocolate tip for you:
It's really easy (too easy!) to over-heat chocolate.
Chocolate starts melting around 30-32'C. Once it's melted the temp. is around 40 - 45'C, depending on whether it's dark, milk or white chocolate
But it should not get to temperatures above 46'C (48'C for dark chocolate.)
So... you have a degree or two leeway. Eek!! 
If you've overheated your chocolate, it looks kind-of melted, but instead of  pouring freely off the spoon if kind-of plops of the spoon  ... in a different kind of way to un-melted chocolate! It's preparing itself to seize.  (Chocolate's version of a kiddie's temper tantrum). You may in fact think that it's not melted enough, and continue to heat it. Bad idea! If you recognise that it's getting to the over-heated stage, immediately remove from the heat source and stand the bowl containing the chocolate in a larger bowl of cold water. (Don't let any of the water get into the chocolate, it will seize!) Stir until the chocolate begins to cool down. You may rescue it.

This is what melted chocolate should look like for dipping cake pops:


(Music credit - Falling by Julee Cruise)


And this is what overheated chocolate looks like - note how it appears lumpy; don't confuse this with under-melted chocolate!


(Music credit - Fix You by Coldplay)

I hope that helps! 


Happy (end of!) Movember ;o) 

xxM 

Friday, 20 November 2015

Russian Teacakes / Pecan Shortbread Cookies

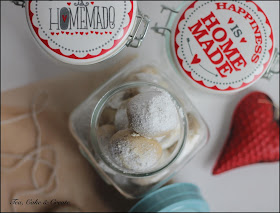
It's time to start buying some jars. What jars? The ones you're going to fill with delicious treats for your kids' teachers end-of-year gifts, of course... you being the craftsy baker that you are!  ;o)

I recently bought some perfect gift jars (c/o the local Mr P). And then went back and bought more, because I wanted  needed to keep the first lot for myself. I'm sure I'll need them for something. Sometime.

Anywaaay... here's an idea for jar-fillers:
These  cookies are known as Russian Teacakes, or Mexican Wedding Cakes, or Snowballs.
None of which really work to describe these delicious, melt in your mouth, nutty, shortbready biscuits covered in mounds of icing sugar (hence the term snowball!).
They're very easy to make - especially if you use a food processor to chop the nuts. In fact, use a food processor for the whole recipe!
Here's how...


Russian Tea Cakes/ Pecan Cookies

Ingredients:
180g pecan nuts
250g butter, at room temperature (that's important)
320g cake flour, sifted
70g icing sugar, sifted
1/2 tsp salt
1 tbs vanilla extract

Plus extra icing sugar for dusting.


Method:

Chop the pecan nuts into small pieces using a food processor. Remove one third of the nuts*, and continue to process the rest until finely ground and almost paste-like.
Add in the butter, flour, 70g of icing sugar, salt and vanilla. Pulse until mixed. Then mix in the remaining finely chopped nuts* (doing this gives the cookies some extra pecan-nutty texture; if you have too many large chunks of nuts, the cookies tend to break apart easily.)

Use a teaspoon to measure out mounds of dough. Roll into balls and place on a lined baking tray.
Bake at 180'C for approx 15-18min, until they are just a touch golden - it's better to under-bake rather than over-bake these cookies.
Sift the extra icing sugar over them as soon as they come out of the oven; and again once they've cooled down.
Store in an airtight container -  a pretty jar will do :o)


Happy baking!

xxM

Tuesday, 10 November 2015

Drip Cake with Macarons

Drip cakes (inspired by Katherine Sabbath) are really trendy right now.
They look pretty easy to make - don't they? It's just an iced cake with a bit of ganache poured over the top and a bunch of goodies piled onto that. Easy-peasy.
Yeah, right!
It's surprisingly tricky to get a good looking drip-effect, for one. Especially when you're doing it in 40'C heat! So mine dripped...dripped... and dropped..!


And then this particular cake (made for my macaron-loving niece) involved 4 batches of those tricky treats to get the different colours and flavours of macarons which I wanted to decorated the top of the cake.
(Read about my first forays into macaron making, and the recipe I still use, here).


Despite that, it is definitely a style I'm going to attempt again. Just remind me to do it on a cool day!


See a great short video on creating a drip-effect by Renee Conner here. (Wish I'd watched that first!) 

Happy baking! 

xxM 


Monday, 2 November 2015

Witch and Wizard Cake

Note to self: Read Notes to self! Because I've noted this before... take before and after photos!

So, you're just going to have to take my word for it...

This was a cake that I made as a surprise gift for a friend's Halloween birthday party.
It was covered in light blue fondant that I then airbrushed with purple in a few areas, followed by a mixture of navy blue and black.
The speckled-star effect is created by flicking white gel colour onto the airbrushed background with a stiff-bristled small paintbrush.


The him & hers witch and wizard toppers are made out of a fondant / modelling chocolate blend.


I wish I'd had the time to make a lower tier, but alas... time was in short supply last week, and magic time-turners were out of stock.
So I'll use that excuse to explain why there's no "before" picture...!


Happy decorating!

xxM

Sunday, 1 November 2015

Halloween Cookies and Cupcakes

Ok, so on further consideration I won't get away with a simple two-colour palette for Christmas. (And I did give it serious consideration. But it's that darn green, always creeping in and wanting to be part of the action...!)
I have managed to squeeze in another set of dual-tone cookies, though, before we get caught up in the red, white and green onslaught!

Halloween is met with mixed emotions in SA; so I've stopped offering classes with this theme, unless specifically requested. But I love decorating Halloween-themed treats, and I jump at the opportunity to do so when I can. This year it was by squeezing in a mid-week specially-requested cupcake class, and making some cookies as a gift for a friend whose party was on the 31st.

 I nearly made the cupcake class a simple combination of orange and black, but added some purple in the end...


The cookies, however - I stuck to my double-barrelled guns. (One colour in each barrel - get it?!)

Here are a couple of process shots:

The cookie was flooded with white royal icing, left to dry then airbrushed with yellow, followed by orange around the edges to create the "glow".  The image was sketched onto the completely dried icing. 

The outline of the silhouette-image was piped onto the cookie with detail-consistency (soft peak) royal icing then filled in with flooding consistency icing. 


And the finished products: 


Happy Halloween-decorating!

xxM

Sunday, 25 October 2015

Golden Cookies

And now from black and white to gold... (Maybe I should have made them green and gold, but let's not talk about the rugby! Ugh!)
It's another batch of cookies with a simple colour scheme.
I'm getting too used to this - only having one or two colours of icing to prepare... Will I get away with just red and white for Christmas cookies, do you think...?!


I flooded all of these cookies with ivory coloured royal icing, then airbrushed on the gold sheen once the icing was dry.
All the details, and the bodies of the dragonflies and butterflies were piped on after airbrushing.
But while the bodies and those dots were left un-gilded; once they were dry, I  hand-painted gold sheen onto the swirls and dots on the insects wings, and the veins on the leaves.
Why not just airbrush those, too? Because, although you can't see it well in the picture, it's a richer gold than the background colour.

 The tiny dragonflies and flowers were created with moulds, using ivory coloured CMC/ tylose paste  and the gold accents painted onto those.

I also added some brown dusting to create shadows and antiquing.
Simple colours, but many steps as it turns out!


If you don't have an airbrush, you can still get a gold sheen on your cookies - use a nice soft blusher brush (purchased specifically for decorating cakes and cookies, not the one from your make-up drawer!) and gold lustre dust powder. Just dust it onto your cookies once the icing has dried completely: Gorgeously golden cookies!

Happy decorating!

xxM

Sunday, 18 October 2015

Black and White Cookies

When I scheduled this theme - Black and White Cookies - I had a very clear idea of what I was going to do, but the months between the scheduling and the doing had clouded that inspiration, and when I was due to make the demo's, I found myself at a loss as to how to pull it all together. I'd promised stamping, stencilling, and brush embroidery techniques. In only two colours.
Yes, I know - looking at them now, it's clear that "Black and White Elegance" was the way to go, but I had a few stressful days there, all right?!


Here's a refresher on how to create a quilted effect on a cookie.
( I say refresher, because that was one of the earliest cookie tutorials I wrote on this blog, even before I had access to small, neat 00 icing tips. I cringe when I look at my amateur photography and early cookies; but if you insist on seeing it ... you'll find that post here!)


Quilted Cookie Tutorial:

Using an edible marker, or non-toxic graphite pencil, outline a grid of squares on the cookie. Pipe lines over the grid using an Ateco 00 or  PME 1.5 tip and soft-peak consistency royal icing 

Flood alternate square with flooding-consistency royal icing and allow to set (+/- 20min - depending on the ambient humidity). Once those squares have set, fill in the remaining squares.
Allow those squares to dry, then pipe dots of icing (soft-peak consistency) where the edges of the squares meet. Allow the cookie to dry completely overnight before packaging.


Happy decorating!

xxM 

Saturday, 10 October 2015

Daisy Cake

One of my greatest pleasures (and often challenges!)  in decorating, comes from choosing which colours to use together. 
Working it out is like a little bit of science, a little bit of art, and a little bit of magic!
  
   At the moment I'm enjoying using simple colour combinations  - bold ones like the black and white that we're using in an upcoming cookie class; orange and black (guess what October theme that's for!); and fresh ones like this combination of yellow and white.     
A very skilled cake artist that I know, once suggested that the addition of a bit of green often made the other colours on a cake "pop".
So, while not wanting to take anything away from the simplicity of the yellow and white, I thought some hints of green was good idea for this cake, to bring it to life.  What do you think? 


Daisies: 

Cut out the daisy from white CMC paste, use a leaf veiner to add detail

Place in a flower former to dry the petals slightly cupped


Dust the centre of the flowers with green dusting powder [this colour is Avocado from the Rolkem Rainbow Spectrum range] 


Use a little CMC glue to place the flower centres [these were made from yellow CMC paste, and cut with  Jem Cutters daisy centre stamps] Allow to dry completely before placing on the cake. [Use royal icing or melted white chocolate to insure they are securely stuck on]  


Yellow and white daisy cake...with a touch of green!


Happy decorating!

xxM