Pages

Saturday, 28 July 2012

Royal Icing

  I've given you a link before for the Royal Icing (RI)  recipe that I use, but I just wanted to go over a few things with you...

Royal Icing Recipe

Ingredients:

5 TBS meringue powder - in South Africa it's called Actiwhite; find it at a baking supply shop, OR 4 large egg whites.
3/4 cup warm water - omit if using egg whites instead of meringue powder.
1tsp Cream of Tartar
1kg sifted icing sugar.

This makes enough icing to cover  60-80 cookies,  depending on their size.
You can also halve or double the recipe. But RI freezes well, so if you are not going to use it all, freeze the rest until you need it.

Technique:
Because this is Royal Icing, egg white based - just like making meringue - you have to make sure all your equipment is grease-free. So give it a wipe with a paper towel and lemon juice before you get started.


In the bowl of your electric mixer, use a hand whisk to mix the meringue powder and water together, then add the cream of tartar and briefly whisk again.


Then, add all the sifted icing sugar to the mixing bowl and mix at low speed for 10minutes, using the paddle attachment, not the whisk.


Don't mix for longer than 10 minutes, because then the RI will be too aerated, and instead of setting hard on the cookie, it will be soft and powdery.


I usually scrape down the sides of the bowl halfway through the mixing time.
 And add vanilla extract for flavor (I use an extract from  Vanilla Girl, so it's just a few drops, and doesn't affect the colour of the icing).


The final mixed product is stiff.  Too stiff for most piping.

Decant it into different containers to colour and water down.  I use gel colour for the most part, sometimes powdered food colouring, and never the supermarket variety liquid food colours!

Water it down teaspoon by teaspoon. It's easy to add too much water, and then it takes a lot of icing sugar to get it back to the stiffer consistency that you wanted.
I usually add a little water first, and then a few drops of gel colour.


The consistency that you are aiming for depends on what you want to achieve.
Personally, I like the way that Marion - from Sweetopia - uses her RI. She uses the same consistency to outline and flood her cookies: 10-15sec icing: meaning that if you take a clean knife, and draw it through the icing, it takes 10-15 seconds for the furrow to close over and fade away.  This consistency creates a nice full surface, and is great for wet-on-wet work.


Because 15sec icing spreads a bit, for finer detailed work I use firmer icing: "soft-peak" icing (the icing peak collapses over when lifted up).

Make sure that your icing is always covered - either with a damp cloth, or in a lidded container. RI dries out very quickly when exposed to air...except when it is on a cookie! I usually run a damp finger around the edge of the container before I put the lid on, just to clear up the icing clinging to the walls of the container, so that it doesn't crust and land up flaking into the icing below it.


And keep the tips of your icing bags in bit of damp paper towel in the bottom of a glass. 


The foreground layer detail on these bugs was added with soft-peak icing, using an Ateco 1 nozzle, once the background layers had dried.

 The feathering on the butterflies wings was done using 10sec icing wet-on-wet techniques, with an Ateco 2 nozzle.


Now is a great time to be working with Royal Icing - we don't have Summer humidity issues playing havoc with it!

 So, just go crazy and experiment. If it doesn't look great, just eat it! 


Happy creating!

xxM 


Friday, 20 July 2012

Baking cookies... again!

Following on from the previous post (Cut-out Cookies), once you have found a recipe that works for you, there are a few tricks to getting the best results from your dough.

Unless it isn't recommended for that particular recipe, I generally refrigerate my cookie dough before rolling it out.
I roll out onto a non-stick silicone mat, but you can use wax-paper. And I place a sheet of wax paper on top of the dough, too.


You can buy dowels at the hardware store - they are a great way to ensure that you roll out your dough to an even thickness.


Then pop the cut-outs into the fridge or even the freezer for about 15 minutes.


I don't have many baking sheets, or a very big oven, so I put cut-outs on wax-paper while I'm waiting for the cookies to bake, then slip the whole sheet onto a baking tray when one comes out the oven.


Bake at the recommended temperature, and set your oven timer! Cookies bake fast, and there are countless times that I would have completely forgotten that I had a batch in the oven if it weren't for the timeous reminder of the timer!


Leave your cookies to harden and cool slightly before transferring to the cooling rack, just so that they are not too delicate to move. Let them cool completely before icing.


If I'm not flooding them shortly after baking, then I store the cookies in Tupperware with paper towel between the layers.
The paper towel also absorbs some of the surface grease, which should help to prevent fat spots leaching into the Royal Icing.


If it is a particularly high-fat cookie, then I put new paper towel between the cookie layers the next day. This is also really helpful in humid summer when nothing dries out as quickly as you want it to - especially cookies and Royal Icing.  


Happy baking!

xxM
Cut-out Cookies: Recipes

I've been feeling so dreadful this week that I thought the only thing I'd be using my measuring spoons for was cough syrup...but thank goodness for Myprodol! I actually managed to do quite a bit of baking: lots, and lots of cookie dough and a big batch of Royal Icing (I use this recipe). I also attempted some cookie decorating, but despite the drugs - or maybe because of them : }  - I just couldn't get my head and hands to co-operate. And Royal Icing isn't very forgiving. Oh, well. We'll just have to eat the evidence....

The reason for all the batches of cookie dough is that I have a couple of cookie decorating classes coming up, and my son's 4th birthday. 80-90 biscuits for each cookie class, and about 50 for the birthday boy.

I've been having some trouble with my cookie dough recently, though. Lots of surface bubbles. They taste great, but they just aren't the ideal canvas for decorating. So, I went to the experts: two of my favorite, inspiring (so good they are positively intimidating!) cookie decorators are Marian at  Sweetopia, and Sweet Sugar Belle . I've been reluctant to try their standard cookie recipes because they both use icing sugar instead of granulated sugar in the dough. Why that didn't appeal, I can't really say! I'm just not into super sweet. Well, I was being super silly!

I went with Sweet Sugar Belle's basic sugar cookie recipe - made up a couple of batches and popped it into the freezer to roll-out and cut-out later. Then I went back to read her notes, and to my disdain read that the dough doesn't refrigerate or freeze well!! Damn!!

The recipes I regularly use all call for refrigeration of the dough and the cut-out cookies before baking to prevent spread. So, this was different. It certainly was easier to roll out dough that hadn't been in the fridge, but then moving the softer shapes to the baking trays was a bit trickier...I was cursing, a little...again.

Anyway... A couple of Myprodol and an hour later, the dough was rolled out, cookies cut out and all baked.

They did spread a little more than my other doughs do, but it was a pleasant Salon-blow-dry kind of volume rather than an eighties-hair-all-over the-place kind of thing, if you get what I'm saying....?!
And they tasted good. Very good.

Now I just have to box and freeze the baked cookies (which do apparently freeze well!) until I'm ready to decorate them. When the virus and drugs are out of my system.

I've also tried out a new Mocha cookie recipe...but that dough is in the freezer. I'll let you know how it turns out.

Pink animal print, inspired by Sweet Sugar Belle

xxM

Friday, 13 July 2012

Butter Icing

There is nothing terribly difficult about making butter icing...butter and icing sugar, pretty much stating the obvious ; )
You can of course use margarine, and if you want a really white - no buttery yellow undertones - icing, then you use a pure white margarine like Wooden Spoon.  

However, I have to tell you, I may have been confused about whether I was Team Jacob or Team Edward, but when it comes to Team Butter vs. Team Margarine, it's butter, butter, butter for me!
Margarine is just too synthetically greasy, I can't bear the thought of eating it, or even worse, feeding it to my children, so I opt for butter as our artery-clogging saturated fat of choice!

Whichever you use (and I do believe butter produces a superior result), the ratio is 2 parts icing sugar, to 1 part butter / margarine, ie 1kg icing sugar : 500g butter.

The trick is then to beat, beat, beat the butter /margarine first (especially if you are using Wooden Spoon White marge. ) until it is pale and smooth. (Start with the butter/ marge at room temp.)


...see how smooth the butter is on the mixer's paddle.

Then add all the sifted icing sugar, and beat until smooth, and fluffy.


If it is too stiff, you can add a tablespoon of milk.  

You can add any flavouring you choose, but it is always a good idea to have vanilla as your base, and then add other flavours onto that. And of course colours. 

If you use butter, the creamy yellow colour does affect the colouring process (blue looks aqua, instead of true blue, etc.) So, if you want white/ pink/ blue without yellow undertones, go with the white margarine, and use caramel essence for flavour, as it doesn't add any colour to the icing the way vanilla extract may.  

Wedding dress cupcakes, with butter icing


Happy baking!

xxM 

Wednesday, 11 July 2012

Cream cheese icing / chocolate cream cheese icing

There are some recipes that I try to avoid being asked about, not because I don't want to share, but because I can't say exactly what goes into them!
My cream cheese icing is one of those.

There are a whole lot of recipes out there for cream cheese icing(CCI), mine is slightly different - but try any one of them; I just like cream cheese icing that is stiff enough to pipe well, and not so sweet that you lose the taste of the cream cheese.

Have you ever had CCI go all runny on you: Just when you are adding the icing sugar, which is when you'd think it would start to stiffen up?! So frustrating!
I like to decorate cakes and cupcakes, not just pour icing over them : )

So, I finally paid some attention to what I was doing the last time I made some CCI, so that I could share the recipe with you...

This is what I use:


Cream Cheese Icing: 
Recipe by Tea, Cake & Create
(Enough for 12-15 cupcakes, double if more is required)

250g tub cream cheese - the denser kind, like Lancewood or Woolworths low fat cream cheese, or Philidelphia. Use it chilled, from the fridge.
100g butter, at room temp.
3/4 - 1 cup sifted icing sugar (yes, that's all!)
Vanilla extract or lemon zest, depending on the flavor you want.

Beat the icing sugar and butter together first. It's not a lot of butter, so the mix will be clumpy. Then add the cream cheese, and beat until combined. Add flavors.
Keep refrigerated.

It is really yummy - my favorite (non-chocolate) icing...propably because it isn't very greasy or sweet, I can kid myself it's just good-for-you dairy ;)

Giant Cupcake with Cream Cheese Icing

Speaking of chocolate icing...

Chocolate Cream Cheese Icing

Sift 1/2 cup of good quality cocoa powder into the above (you may need to add a tablespoon of milk if it gets too stiff), and you will have the most delicious mousse-like chocolate icing.

I added some left over dark chocolate ganache to a batch of this icing the other day; it was so good that, without hesitation, I licked the bowl and spoon clean - a treat I usually reserve my children! (and quickly wiped all traces of chocolate off my face before they could ask me what I was eating!!)


Let me know if this recipe works for you : )

xxM

Sunday, 8 July 2012

Flat-top cupakes

Two years ago, if I had taken a batch of cupcakes out of the oven , and they were flat on top, I would have thought them a failure. It's funny how perspective can change.
Actually, 2 years ago, if I had taken a batch of cupcakes out of the oven and they weren't burnt, it would have been a miracle ;-)
As I've blogged before, when I had my baking / decorating awakening I started to really take care to follow recipes in order to create the ideal canvas for the art of decorating. And a cupcake "canvas" often needs to be flat - a well peaked surface is okay for some icing styles, but for others, a more flat surface is a more flattering surface ; )


Two things contribute to this - the recipe and the temperature of the oven.
The Vanilla cupcake recipe here ( http://teacakeandcreate.blogspot.com/2012/06/cupcake-recipe.html) is a pretty good one, but the temperature of the oven is still a big factor.

My oven runs hot. Some ovens do. "As much as 10 degrees over" I had read. So, I always adjusted for this, and set the thermostat about 10'C lower than what the recipe called for. But I was still producing cakes that were crisp (black) on the bottom and sides.
 My baking confidence was dwindling. I thought it was because I was so distracted by family life, that I wasn't paying enough attention to what was in the oven. But this was happening in half the time the cakes were meant to bake, not because they were in the oven too long.

I bought an oven thermometer. What a revolution!
The first time the thermometer was in the oven, I Googled the manufacturers just to confirm that they were a reputable company - I just couldn't believe the results:
My oven thermostat was set at 180'C, the thermometer was reading 260'C!
 I now bake everything at "100'C" according to my oven, and what do you know - they aren't burnt!

(Yes, time for a new oven. Time for a whole new kitchen, though....I'm thinking Caesar Stone, Lacanche, Smeg... And I'll be thinking it for a while before it happens!)

Back to the flat-topped cupcakes....If they are still peaking, bake them at a slightly lower temperature, and for slightly longer than the recipe states, and you should have a good result.

These ones were baked at a higher temp. than they should have been...


Not bad, but this batch was better:


And one for the road....


...it is supposed to be a Pink Tutu Cupcake..inspired by Cake Boss "Dress cupcakes"...but my sister asked What's that meant to be, it looks like a tombstone on top? !! 

Happy creating!

xM


Tuesday, 3 July 2012

"Anniversary" Carrot Cake

Well, that was a busy weekend...
With two young children, we don't get out terribly much. But this weekend we went to a wedding and then a 50th Anniversary celebration. The wedding was in the Boston area (KwaZulu Natal, not Massachusetts - that would have been a really busy weekend!), and the anniversary was my in-laws, up in the Central Drakensberg.
I only mention this because there was, of course, cake involved : )

I had agreed to do something for desert for the Anniversary lunch, but because we were staying overnight at the wedding, it had to be something that could travel -150km to the wedding, then 200km to the anniversary.  So, I was thinking cake.

Covering cakes in Fondant is not something I am very good at, but like a loose tooth, I cannot resist the urge to work at it....
I had already made a "Gardening Lady" Fondant figurine, and a male counterpart was all I needed to top a two tier square cake.
That was the easy part. Unfortunately I don't always consider the practicalities of these ideas ...

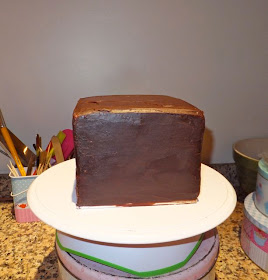
The top tier of the cake was to be ginger, and the lower tier carrot cake.  I'm not the biggest fan of plain butter icing, and because this cake was traveling, and I wasn't sure what the temperature variations were going to be (in the end it was just cool, cold and icy!), I decided that cream cheese icing under Fondant would be a bit risky.  So, the end product was sticky ginger cake with dark chocolate ganache, and carrot cake with white chocolate ganache. Yu-u-um!

Ganache between ginger layers


Dark chocolate ganache & ginger cake


White chocolate ganache and carrot cake


Once I start preparing Fondant for a cake, I generally think I'm out of my depth. And I probably am!
I'm much more comfortable working with small rounds of Fondant for the tops of cupcakes, so rolling out the large sheets that are needed to stretch across a large cake are a challenge. 

Anyway, much rolling and re-rolling later, the cake was covered. The wide chocolate MMF ribbons around the base of the cake are to hide the pleats I just can't seem to quite avoid... 


...And the figures were supposed to be on the top of the cake, but they snapped off their spaghetti stakes, lost their heads, broke off hands, shattered hats... so it's a good thing the photo isn't the best quality, or you'd see all the hasty repair work...
 ...the watering can and spade are concealing the stake holes on the top of the cake....

A-n-y-w-a-y... this is the carrot cake recipe.  It is scrumptious! 
It worked very well with the white chocolate, but I do usually cover it with cream cheese icing.  

Scrumptious Carrot Cake:

2 cups cake flour
2 tsp Bicarb 
1 tsp baking powder
1 tsp salt
2 tsp cinnamon
1 cup sugar
1 cup vegetable oil
3 eggs, lightly beaten
2 cups shredded carrots
1 tsp vanilla extract
1 cup flaked coconut 
1 cup chopped walnuts / pecans 
1 can crushed pineapple

Pre-heat the oven to 175'C   
Mix flour, baking powder, bicarb, salt and spice together. 
Make a well; add sugar, oil, eggs and vanilla.  Mix until smooth.
Add carrots, coconut, nuts and pineapple.  Mix until combined.  

You can bake this in a single cake pan; separate it into two cake pans (which is what I did for this cake - 2 x 8 inch square pans) or even make cupcakes out of this batter. 
Bake cupcakes for approx 20 minutes, 2 layers approx 30min, and 1 layer approx 45min - until a skewer comes out with just a few moist crumbs attached.  

The batter is quite resilient (a friend had a cupcake case disaster, and had to remove the batter from the oven, scrape it from the cases, re-dispense it; and it still rose. 

And the cake freezes well, too : ) 

Happy baking!

xxM